目次
モード 4 | Windowsと並行してLinux Mintをインストールする
モード 4 | Windowsと並行してLinux Mintをインストールする
Path A. に進むための前提条件
ここまでに、あなたは「モード 3 — Linuxのインストール方法を選択する」を完了し、自分のコンピュータでどのようにLinux Mintを起動するかを決定しています。
また、コンピュータのファームウェアで「セキュアブート」を無効化し、Windowsの「高速スタートアップ」もすでに無効に設定済みです。
さらに、「モード 1 — Linux MintのUSBを作成する」で作成した起動用USBドライブが手元にあり、「モード 2 — インストールせずにLinuxを試す」にて、ブートメニューからLinux Mintを短時間試用している必要があります。
モード 3で「外付けSSD」を選択した場合は、このセクションをスキップして「モード 4 — パス B:外付けSSDにLinux Mintをインストールする」に進んでください。
このガイドには、実際のハードウェアを使用したインストール過程のほぼすべてのステップの写真が含まれています。一部の画像は(完璧なスクリーンショットではなく)スマートフォンで撮影されているため、多少ぼやけて見える場合があります。それでも、重要なボタンやメニュー、ドライブのラベルなどは十分に判別できるはずです。画面の表示が手元のものと異なったり、「今すぐインストール」をクリックする前にもう一度確認したかったりする場合は、お気軽に「お問い合わせ」ページからご連絡ください。
ゆっくり進めましょう。変更を適用する前に、正しいドライブが選択されているか必ず確認してください。
A1. 最初にバックアップを行う(必須)
- Windowsドライブ内にある、代えがきかない大切なデータ(最低でも「ドキュメント」「デスクトップ」「ピクチャ」フォルダ)をバックアップしてください。
- Cドライブに十分な空き容量があることを確認してください(モード 3での目標:100GB以上の空きが理想的です)。
- 「再起動」ではなく、完全に「シャットダウン」を行ってください。
A2. Mint USBから起動する(ライブセッション)
- Linux MintのUSBを差し込みます。
- 電源を入れ、ブートメニューを開き、USB(UEFIエントリ)を選択します。
- Mintが読み込まれたら、「Start Linux Mint」(ライブ環境)を選択してください。
A3. インストーラーを実行する
- 「Install Linux Mint」をダブルクリックします。
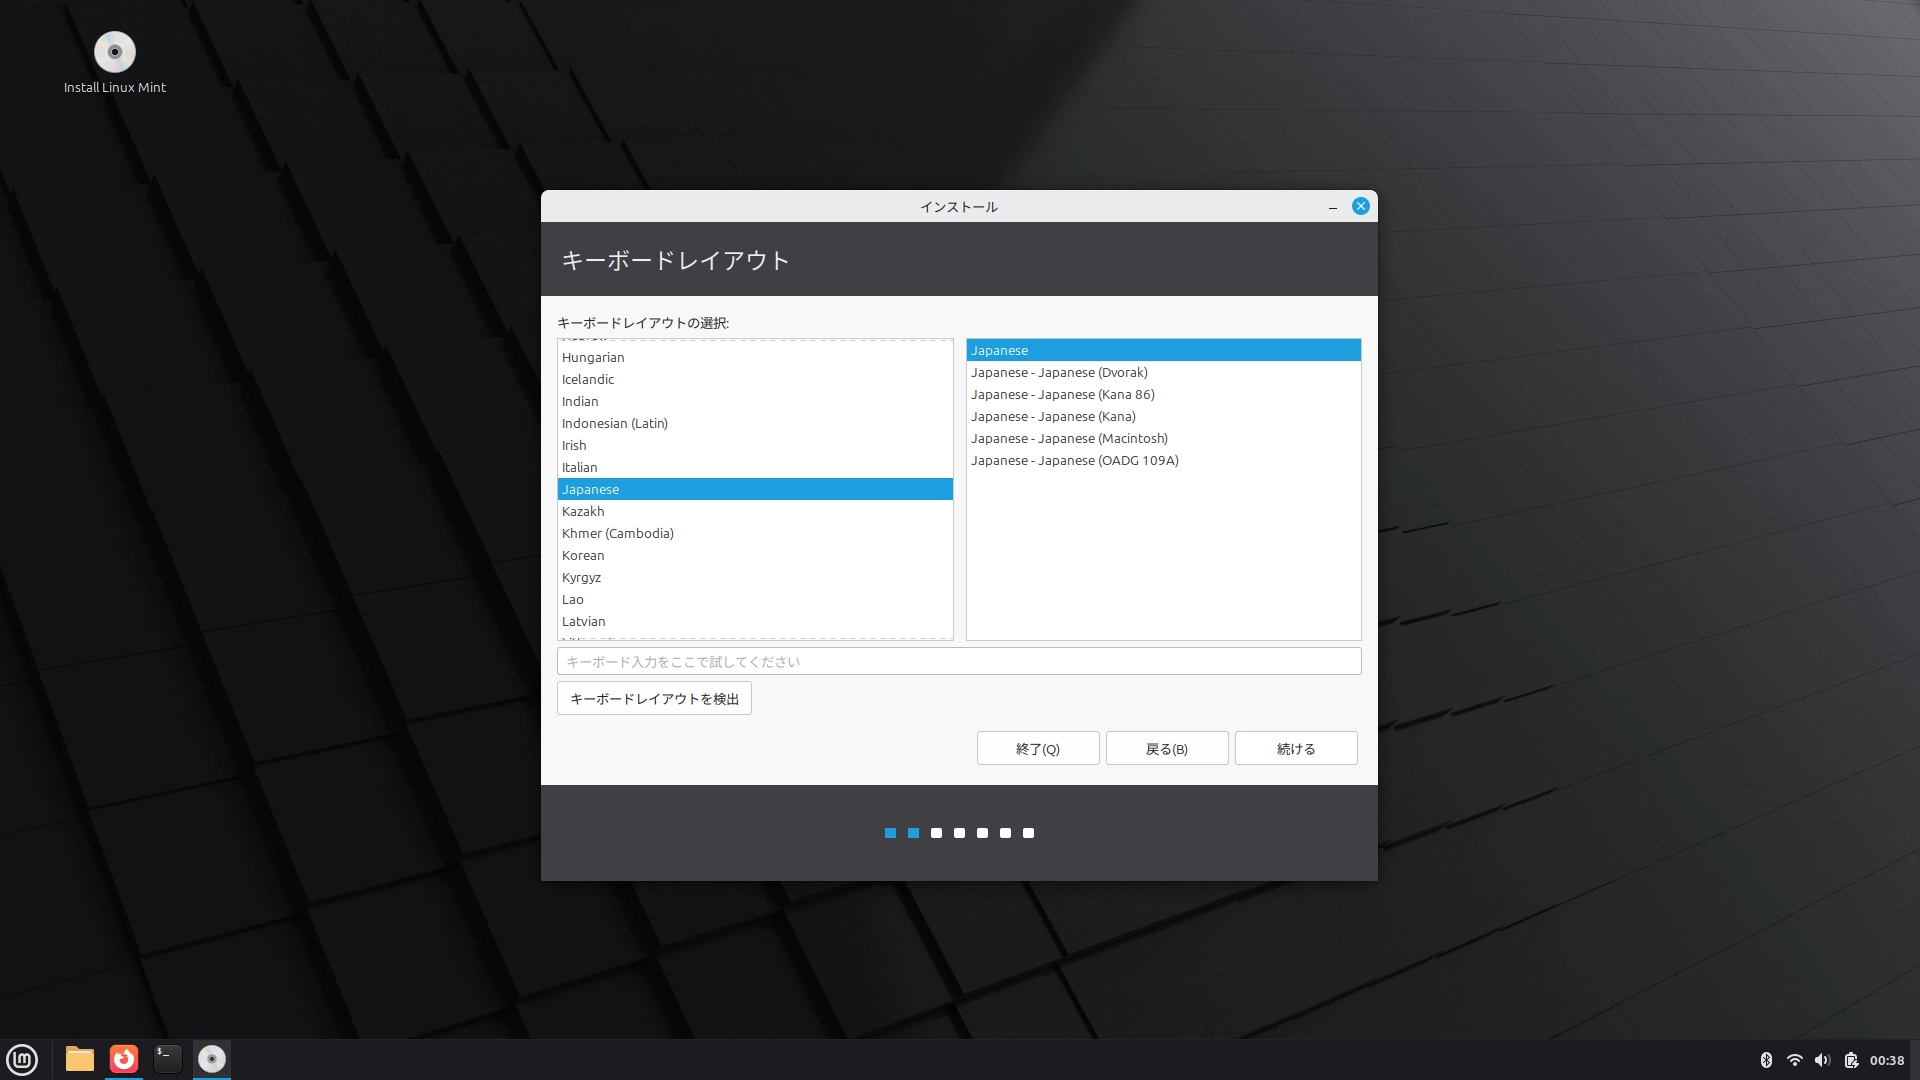
- 言語 → キーボード → (任意ですが推奨)Wi-Fiに接続(セットアップ中にアップデートやドライバのインストールが可能になります)
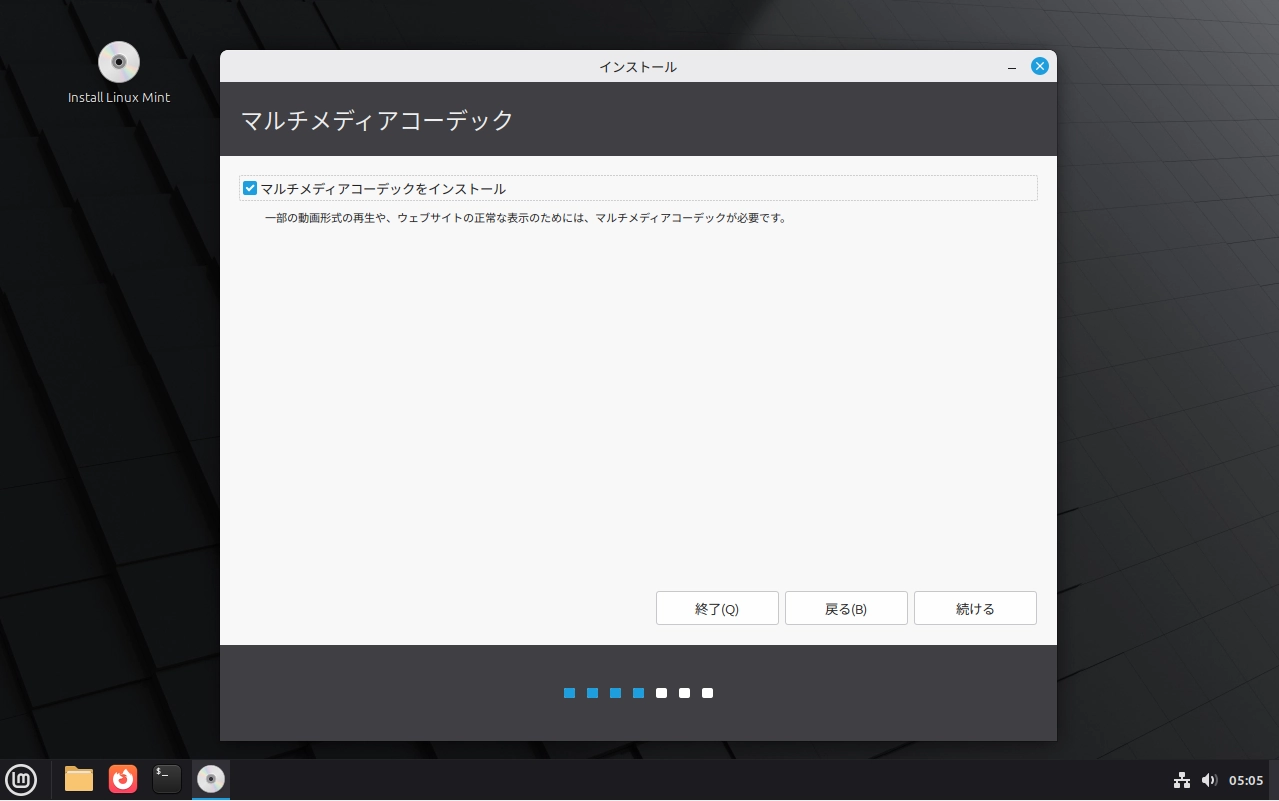
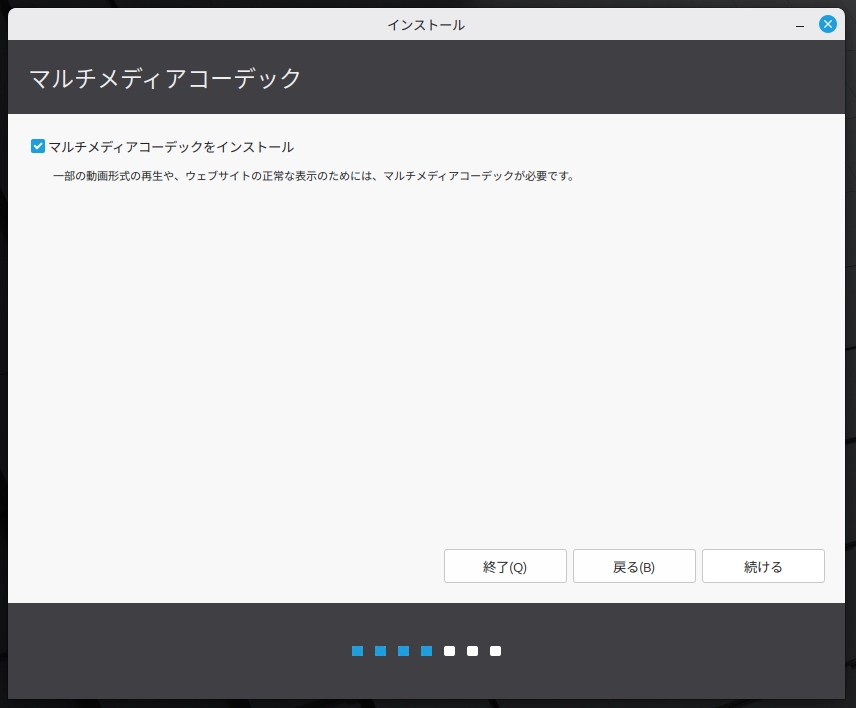
- コーデックとセキュアブートの確認(重要)
マルチメディアコーデックのチェックボックスの下に「セキュアブートを構成する」オプションが表示される場合は、システムでセキュアブートがまだ有効になっています。
このガイドの手順では、インストール前にセキュアブートを無効化しておく必要があります。
セキュアブートの構成に関するチェックボックスが表示されている場合は、この画面から先へ進まないでください。「モード 3」に戻り、セキュアブートを無効にしてからやり直してください。
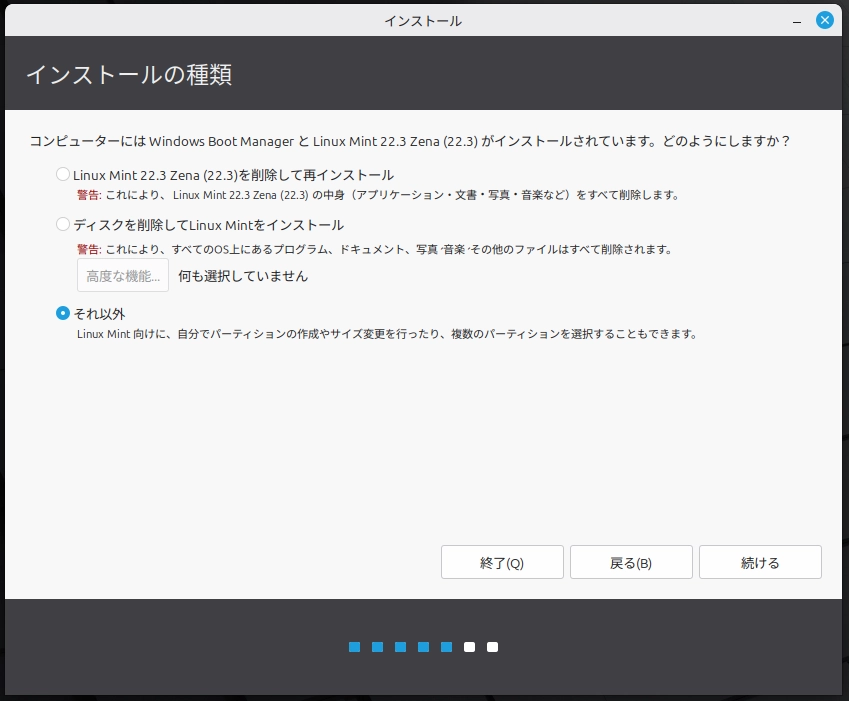
A4. デュアルブートのインストール種類を選択
「インストールの種類」画面では、次を選択してください。
「Linux Mint を Windows Boot Manager とは別にインストール」を選択します。
「ディスクを削除して Linux Mint をインストール」は選択しないでください。
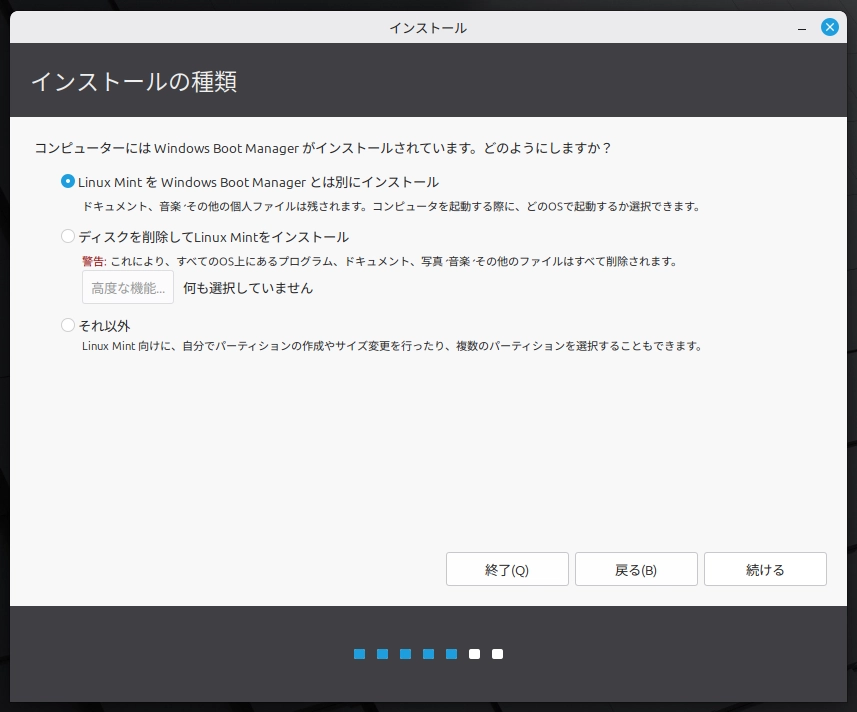
次に:
- スライダーを使って容量を割り当てます。
- インストーラーではより小さいサイズも指定できますが、実用的な最小容量は 40〜60GB です。余裕があれば、より多くの容量を割り当てることで、長期的に Linux が快適に使えます。
- 快適に使う目安は 80〜120GB 以上(可能であれば)です
- スライダーが十分に動かない場合は、Windows のドライブ容量が不足している可能性があります。
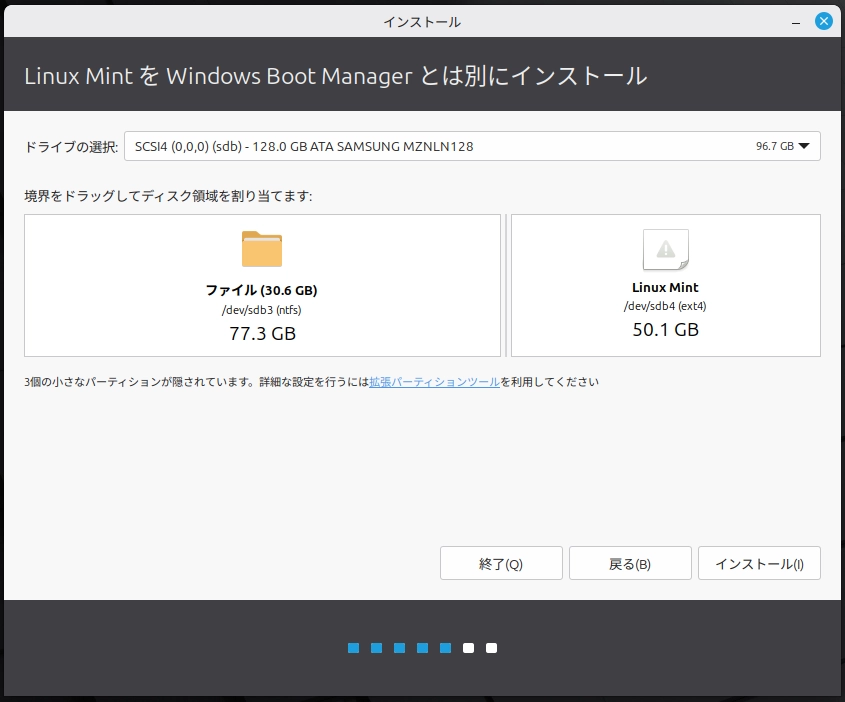
この画面では、Windows と Linux の両方が同じ物理ドライブにインストールされます。
どちらも同じドライブ名(sdb)の下に表示されていることで確認できます。
- sdb は内部ドライブです。
- Windows は NTFS ファイルシステムで表示され、「sdb3」とラベル付けされています。
- Linux Mint は ext4 ファイルシステムを使用し、「sdb4」と表示されています。
これらは、それぞれの OS がファイルを保存するための異なる方式にすぎません。同じドライブ上でも互いに干渉せず、安全に共存できます。
Linux Mint に 40GB 以上を割り当てたら、「インストール」をクリックしてください。
A5. ディスクへの変更を慎重に確定する
インストーラーが「ディスクに変更を書き込みます」と警告を表示したら:
- Windows が引き続き存在していることを必ず確認してください。
- 正しい内部ドライブを選択していることを確認してください(容量で照合)。
- Linux Mint が新しく割り当てた領域にインストールされることを確認してください。
この画面は少し不安に見えるかもしれませんが、内容をよく読んでください。日本語環境では、変更が書き込まれる前に確認画面が2回表示される場合があります。1つ目は、パーティションサイズ変更が元に戻せないことを確認する画面です。2つ目は、実際に実行されるパーティション変更の内容を一覧表示する画面です。
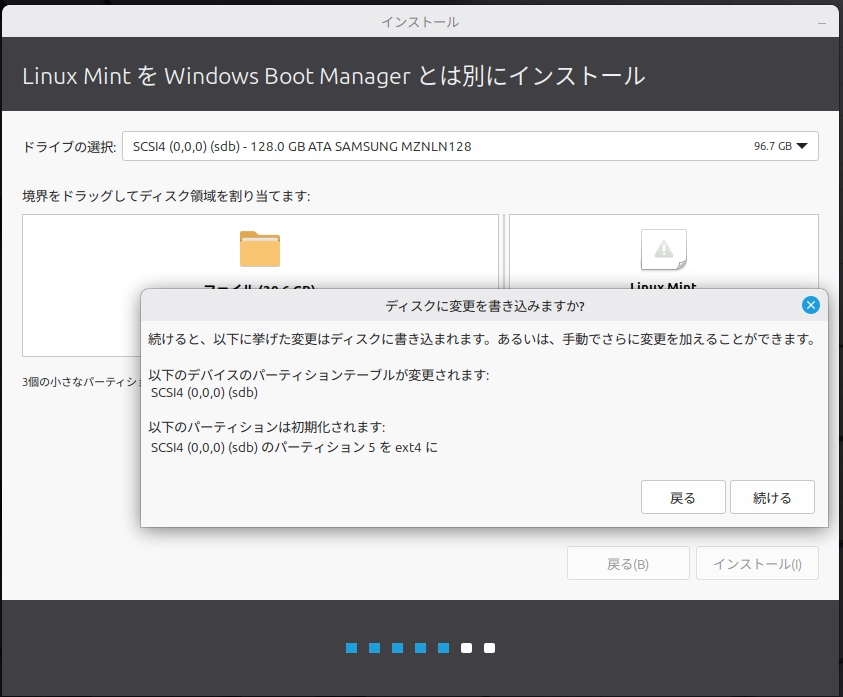
インストーラーには、正しいドライブ上で ext4 パーティションが1つだけフォーマットされると表示されるはずです。その ext4 パーティションは、先ほど Linux Mint 用に割り当てた領域です。Windows のパーティションがフォーマット対象として表示されていないことを確認してください。
「続ける」をクリックします。
A6. セットアップを完了する(インストーラー手順)
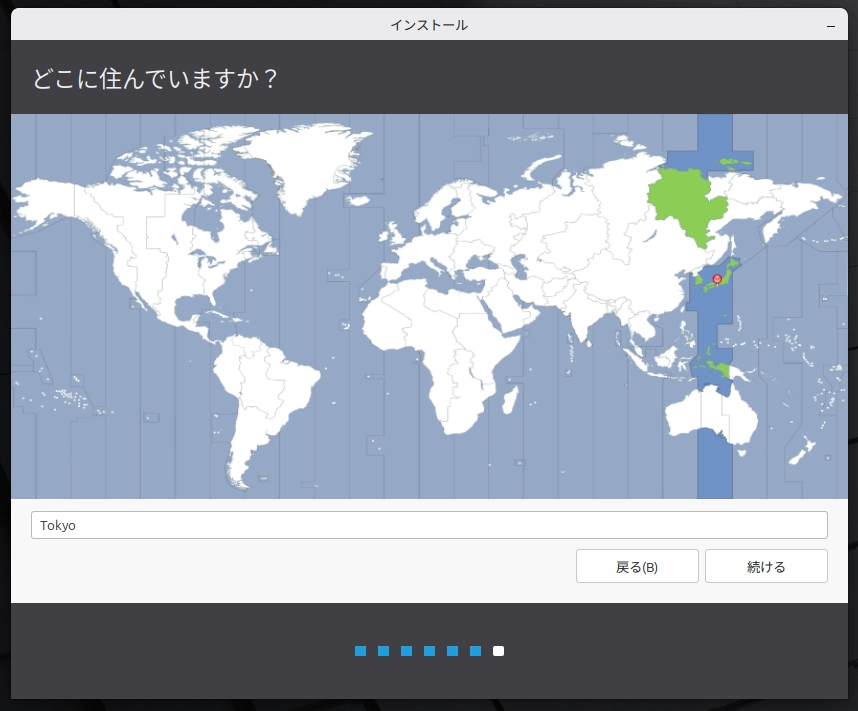
1)タイムゾーンを選択する
地域/都市を選択します(これによりシステムの日時が設定されます)。
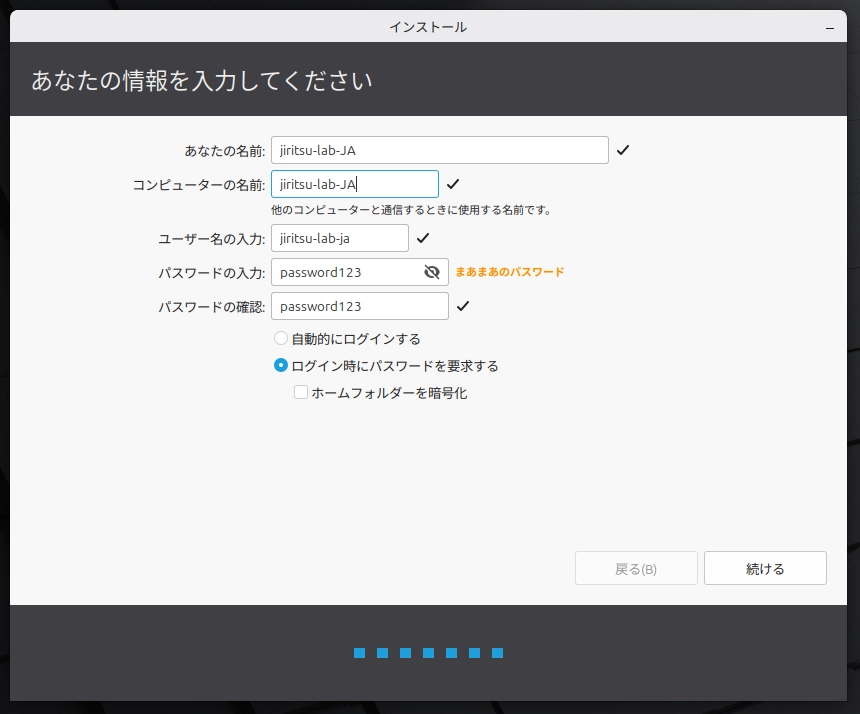
2)ユーザーアカウントを作成する
名前、コンピューター名、ユーザー名、パスワードを入力します。
- 「ログイン時にパスワードを要求する」を選択します(推奨)。
- 特別な理由がない限り、「ホームフォルダーを暗号化」は今はチェックしないでください。
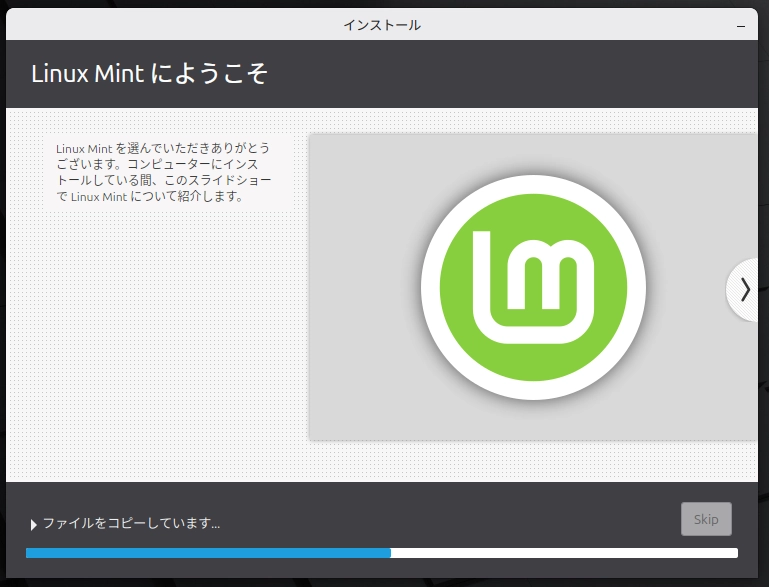
3)インストールはバックグラウンドで実行されます
インストールには通常 10〜30 分かかります(コンピューター性能やインターネット速度によって異なります)。
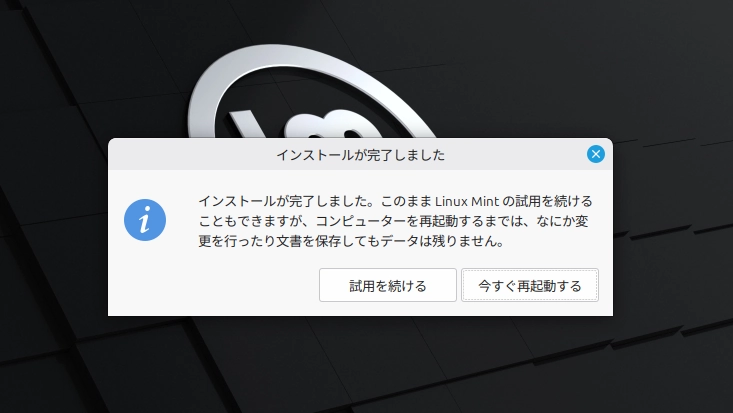
4)指示が表示されたら再起動する
インストールが完了すると、「試用を続ける」または「今すぐ再起動する」が表示されます。インストールが正常に完了したことを確認するため、「今すぐ再起動する」を選択してください。
5)USB を取り外して Enter を押す
次のメッセージが表示されます:
「Please remove the installation medium, then press ENTER」
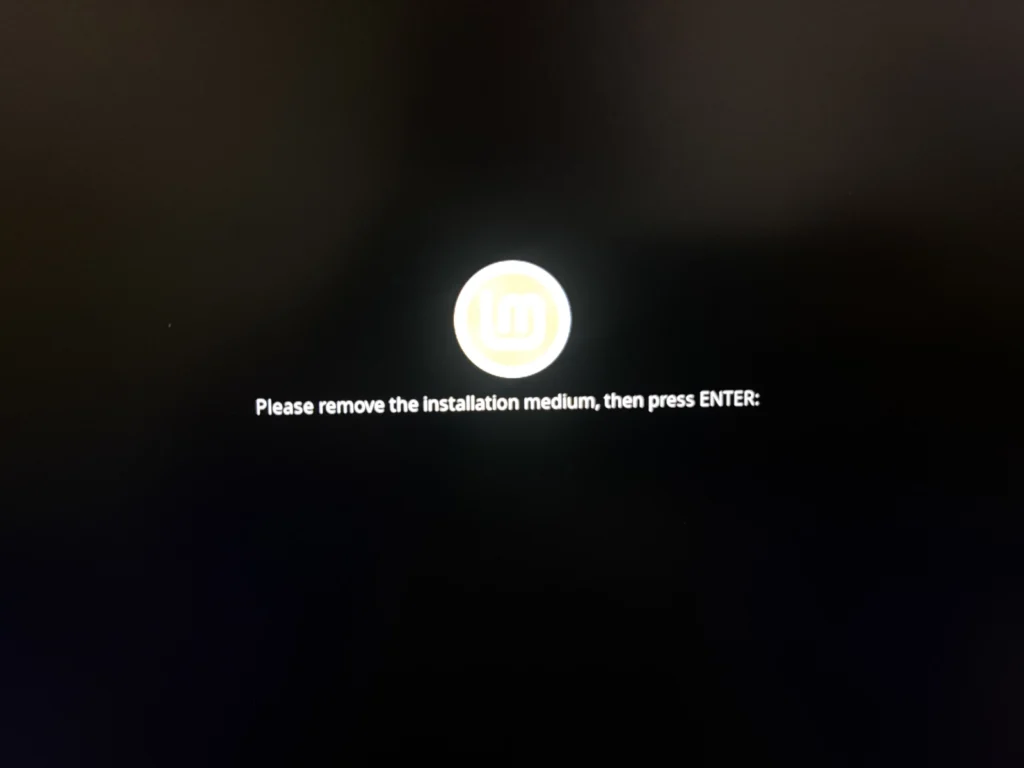
- USB ドライブを取り外します。
- キーボードの Enter キーを押します。
A7.結果を確認する(デュアルブート完了)
再起動後、起動するオペレーティングシステムを選択できるメニューが表示されます。
これは Linux Mint の GRUB ブートメニューです。
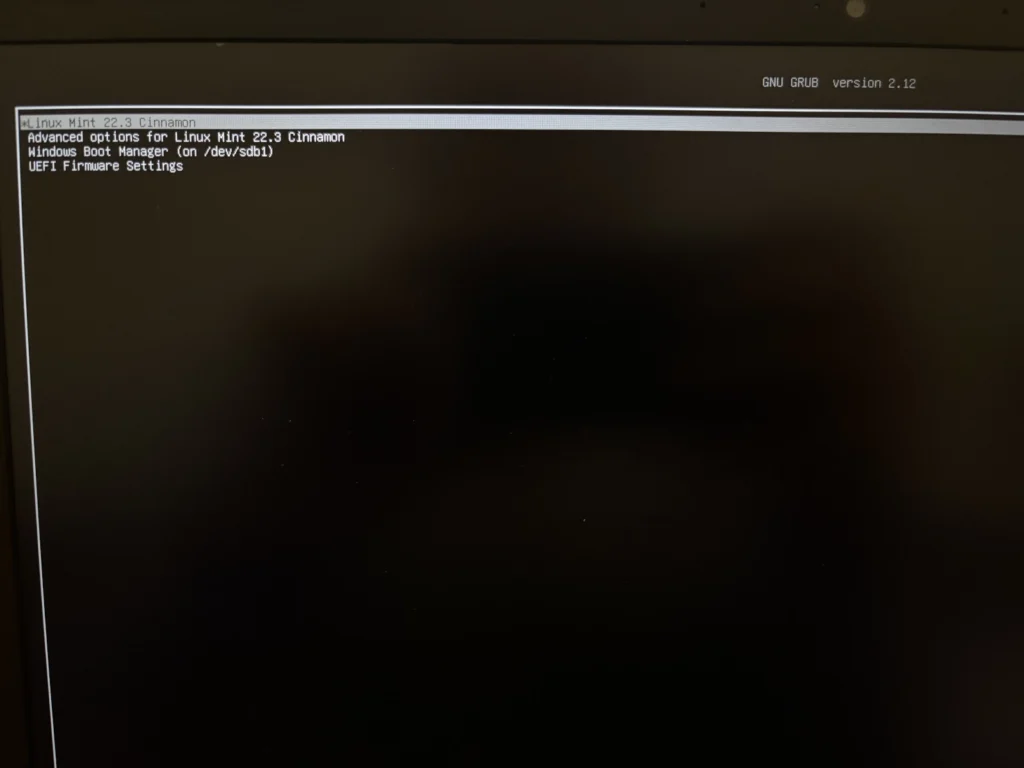
ここから次のことができます:
- Linux Mint を起動する
- Windows Boot Manager を起動する
一度だけ次を行ってください
- Linux Mint を起動し、正しく読み込まれることを確認します。
- 再起動し、Windows を起動して正常に動作することを確認します。
Mode 5 — Linux Mint 内の初期セットアップへ進みましょう。
Mode 4|Linux Mint を外付け SSD にインストール
Path B.外付け SSD
Path B では、Linux Mint を外付け SSD にインストールし、内部の Windows ドライブは変更しません。外付け SSD を取り外せば、コンピューターは元の状態に戻ります。
外付け SSD へのインストールは Windows と物理的に分かれますが、初心者にとって必ずしも「安全」とは限りません。ドライブやパーティションを手動で選択する必要があるため、急ぐとミスが起こりやすくなります。
最初にバックアップを取ってください(必須)
続行する前に、失っては困る重要なファイル(ドキュメント/デスクトップ/写真など)を別の場所(クラウドストレージや別の USB ドライブ)にコピーしてください。このガイドは慎重に作られていますが、インストール作業にリスクがないわけではありません。
Path B(外付け SSD)に推奨されるハードウェア
Path B を進めるには、外付け SSD が必要です(ここに Linux Mint をインストールします)。すでに外付け SSD を持っている場合は、このセクションをスキップして先に進んでください。
これから購入する場合は、以下の製品がLinuxのインストールや日常使用に適しています:
- SanDisk 2TB Extreme Portable SSD (大容量ストレージが必要な方向け)
動画・写真・バックアップなど、大きなデータを保存したい場合に適したモデルです。
2TBの容量があれば、Linuxシステムだけでなく個人ファイルやバックアップデータも同じドライブに保存できます。
このSSDはUSB-C接続の高速ストレージを採用しており、従来の外付けハードディスクよりもはるかに高速です。
Linux Mintをこのドライブにインストールすると、次のようなメリットがあります:
- 起動時間が短くなる
- システムアップデートがスムーズになる
- 全体的な動作が軽快になる
Linuxをインストールしておけば、別のPCに接続してそのまま自分の環境で作業することもできます。
「新しいPCを買う代わりに、今のPCを活かしたい」という場合、このような外付けSSDはとても有効な選択です。 - SanDisk 1TB Portable SSD (多くのユーザーにおすすめ)
Linuxシステム、アップデート、個人ファイルを保存するのに十分な容量があります。
1TBの容量があれば、Linux Mint本体だけでなくアップデートや個人ファイルも余裕をもって保存できます。
このSSDは最大800MB/秒の高速転送に対応しており、従来の外付けハードディスクよりも大幅に快適に動作します。
小型で軽く持ち運びやすいため、Linuxをインストールしておけば別のPCに接続してそのまま自分の環境で作業することもできます。 - SanDisk Extreme Portable SSD 500GB – (高速・高耐久モデル)
この外付けSSDはUSB 3.2 Gen 2に対応し、読み取り最大1050MB/秒の高速転送が可能です。
従来の外付けハードディスクよりも動作が軽く、Linux Mintをインストールすると次のようなメリットがあります:
- 起動時間が短くなる
- システムアップデートがスムーズになる
- 全体的な動作が軽快になる
また、防滴・防塵設計(モデル表記に準拠)と携帯性の高さが特長で、持ち運び用途でも安心して使えるSSDです。
高速で信頼性の高いポータブルLinux環境を作りたい場合に適した選択肢です。
- UGREEN USB-A → USB-C 変換アダプタ – (古いノートPCでは重要)
多くの外付けSSDにはUSB-Cケーブルのみが付属しています。 もしお使いのノートPCが従来の四角いUSBポート(USB-A)の場合、この小さなアダプターを使えばそのまま接続できます。
※開示事項:これらのリンクを通じて購入された場合、追加費用なしでJiritsu Labに少額の紹介手数料が発生することがあります。これは本サイトおよび教育コンテンツの継続的な開発を支援するものです。
注意: 多くの外付けSSDはあらかじめフォーマット(多くはNTFS形式)されており、ファイルが保存されている場合があります。このガイドでは、インストール前にドライブを初期化し、Linux用のパーティションを作成します。
この手順ガイドでは、実際のハードウェアで行ったインストール作業を撮影した写真を、ほぼすべてのステップで掲載しています。一部の画像はスクリーンショットではなくスマートフォンで撮影しているため、やや不鮮明に見える場合があります。ただし、重要なボタンやメニュー、ドライブ名は十分に確認できるようになっています。画面表示が異なる場合や、「インストール」をクリックする前に確認したいことがある場合は、お気軽に「お問い合わせ」ページからご連絡ください。
ゆっくり進めましょう。変更を適用する前に、正しいドライブが選択されているか必ず確認してください。
フェーズB1 ― 外付けSSDの準備(インストーラーを開始する前に)
1)Linux MintのライブUSBで起動する
次の2つを接続します:
- モード1で作成したLinux MintのUSB
- 外付けSSD
USBから起動し、 モード2で行ったのと同様にLinux Mintのデスクトップ(ライブセッション)に入ります。
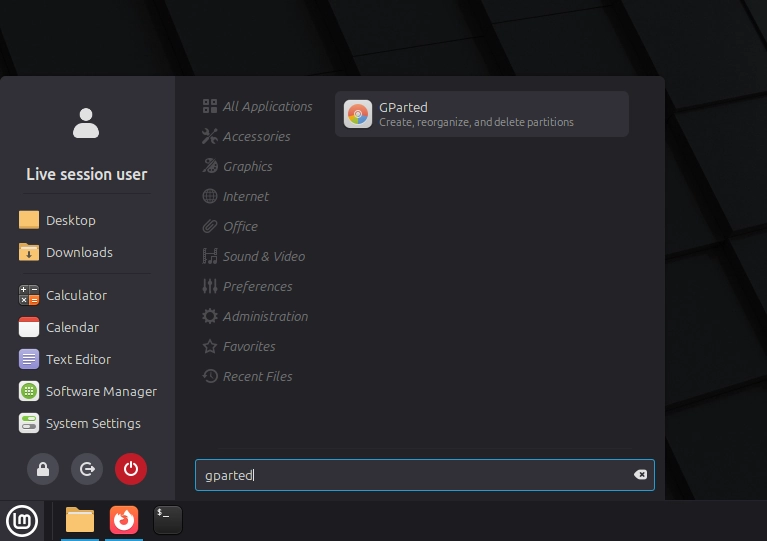
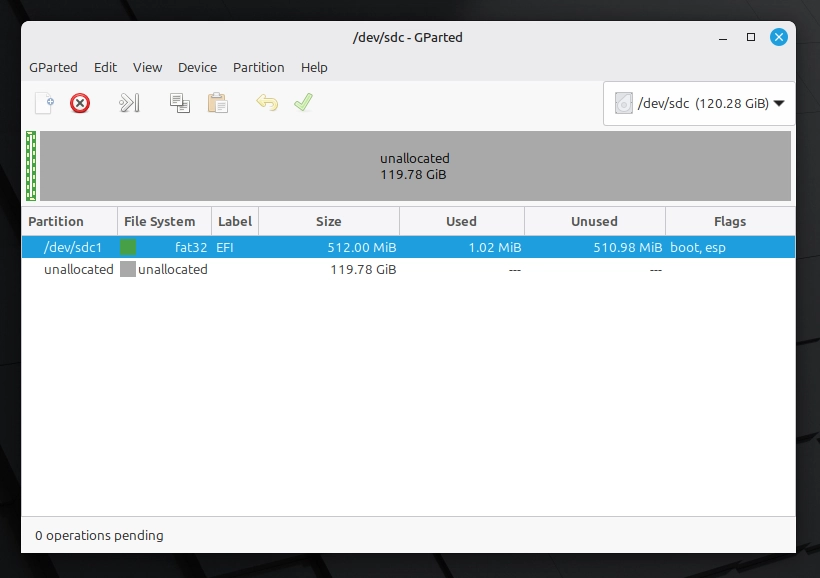
2)GPartedを開く
3)正しい外付けドライブを選択する
ここが最初の確認ポイントです。
GPartedで、容量(例:およそ120GB/240GB/500GB)を目安に外付けドライブを選択します。選択しているドライブが、内蔵のWindowsディスクではないことを必ず確認してください。
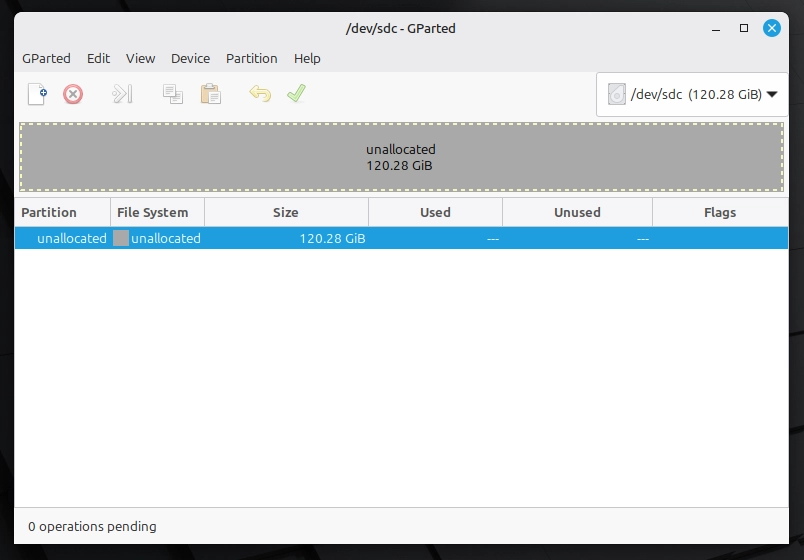
想定される状態:外付けドライブが「空き/未割り当て(unallocated)」として表示される(または、インストール対象として明確に識別できる状態)。
外付けSSDが未割り当てになっていない場合
新品の外付けSSDは、あらかじめフォーマット(通常はNTFS)されており、メーカーのファイルが入っている場合があります
今回のインストールでは、外付けSSDをLinux用に準備する必要があります。
外付けSSDに保存しておきたいデータが入っていない場合は、次の手順を行います:
- 容量を確認し、正しい外付けSSDであることを再確認します。
- GPartedで、その外付けドライブ上の既存のパーティションを削除します。
- 緑色のチェックマークをクリックして変更を適用します。
- ドライブが「未割り当て(unallocated)」として表示されるはずです。
正しい外付けSSDが未割り当て領域として表示されていることを確認してから、次へ進んでください。
*※ドライブの内容を確実に把握している場合以外は、絶対にパーティションを削除しないでください。
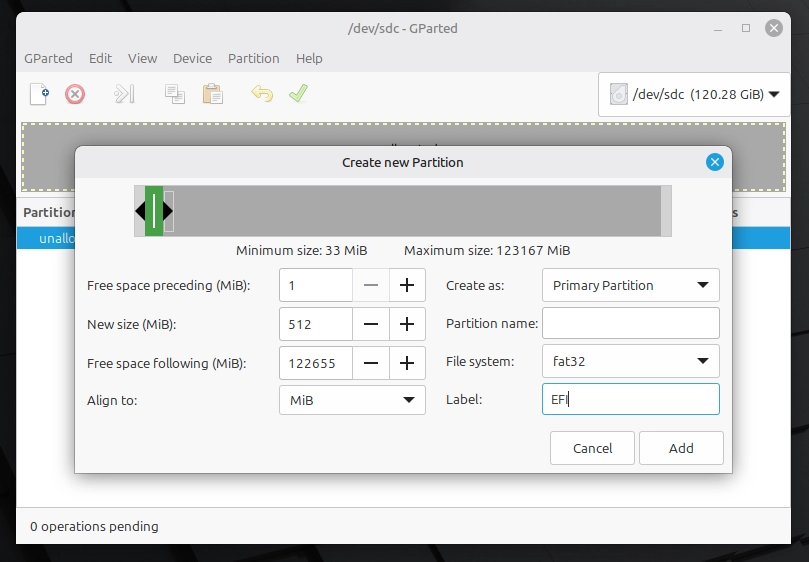
4)512MBのEFIパーティション(FAT32)を作成する
EFIパーティションを作成します:
- 未割り当て(unallocated)の領域を右クリックします。
- New. を選択します。
- 次のように設定します(画面上の英語ラベルに従ってください):
- Size(サイズ):512 MB
- File system(ファイルシステム):FAT32
- Label(ラベル):EFI(任意)
- Add をクリックします。
なぜこの小さなパーティションを作成するのですか?
この512MBの小さなパーティションには、コンピューターがLinuxを起動するために必要なブートファイルが保存されます。
ここには、アプリケーションや個人ファイルは保存されません。
Linux本体のシステムは、この後、残りの未割り当て領域に別のパーティションとしてインストールされます。
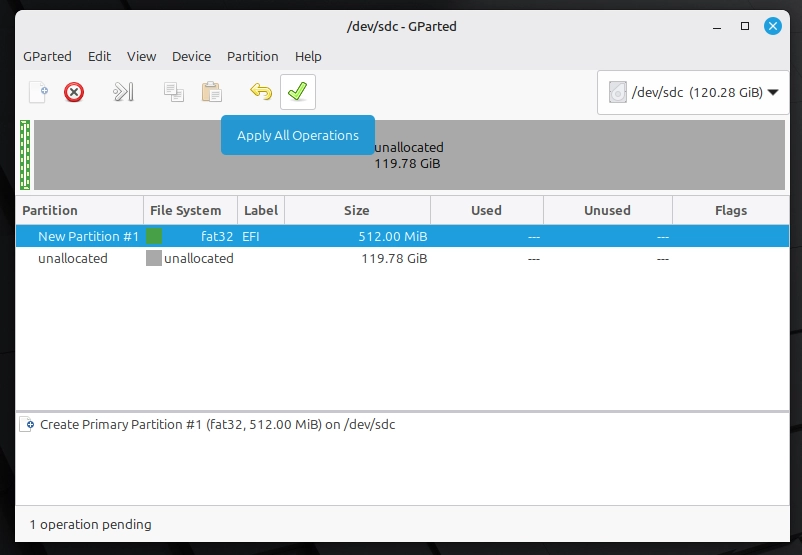
Addをクリックするとパーティションは表示されますが、まだ作成は完了していません。
操作を適用するまでは、実際の変更は行われません。緑色のチェックマークをクリックして変更を確定し、新しいパーティションを作成します。
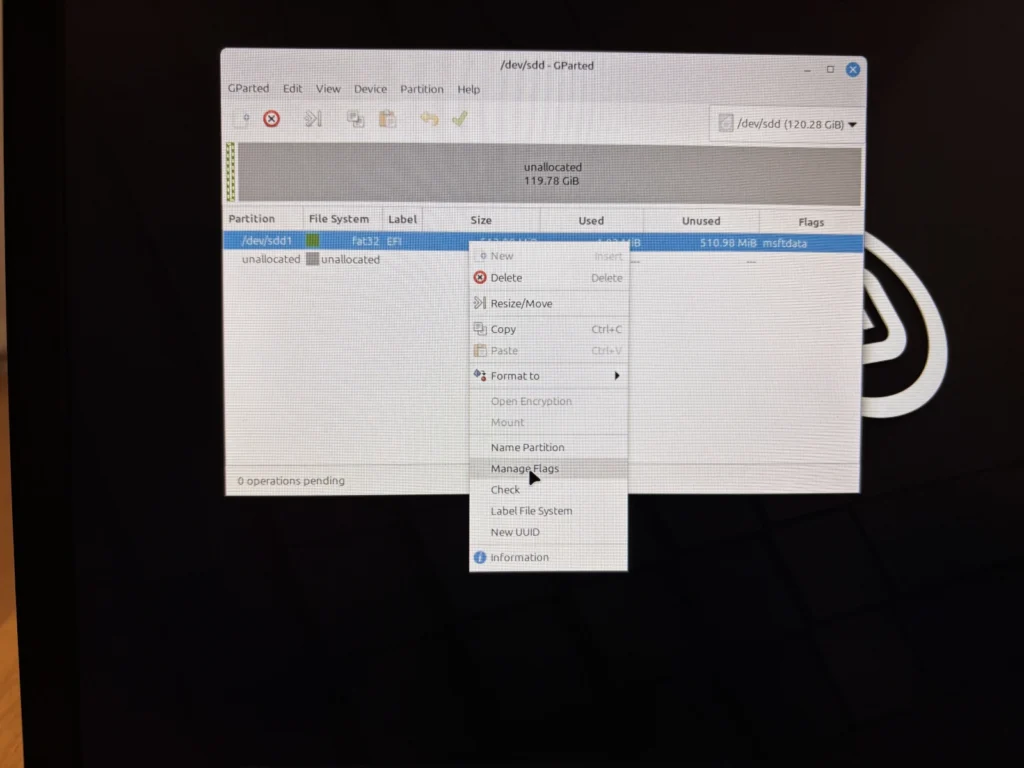
5)新しく作成したFAT32パーティションを右クリックする
「Manage Flags」 をクリックします。
なぜこのパーティションはFAT32なのですか?
UEFIファームウェアは、起動時に特定のファイルシステムしか読み取ることができません。FAT32は、EFIシステムパーティションに必要な標準フォーマットです。
6)boot と esp フラグを有効にする
Manage Flags を開き、次の項目を確認します:
- esp が有効になっている
- boot が有効になっている(表示されている場合)
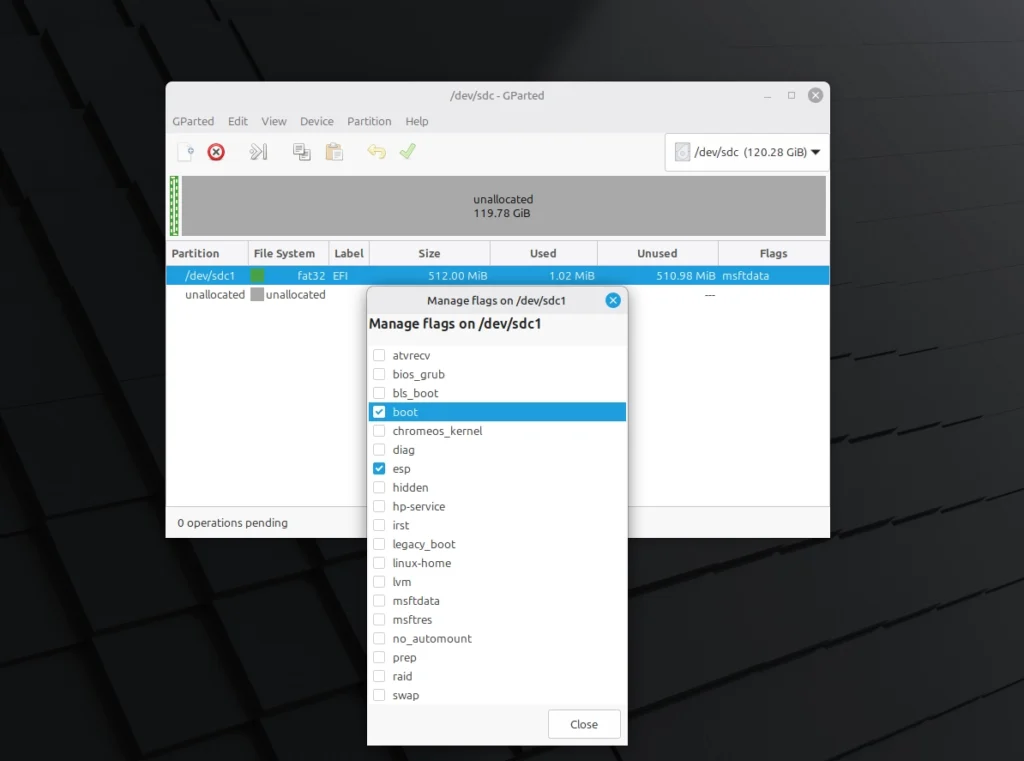
「boot」と「esp」とは何ですか?
EFIシステムパーティション(ESP)には、コンピューターがLinuxを起動するために使用するファイルが保存されます。
- esp は、そのパーティションをEFIシステムパーティションとして指定します。
- boot は、そのパーティションを起動用として使用できるようにします。
ほとんどのシステムでは、 espが最も重要なフラグです。esp と boot の両方が有効になっていれば、そのパーティションはUEFIインストール用に正しく設定されています。
7)パーティション構成を確認する(最終確認)
この時点で、すべてのパーティション操作は適用済みであるはずです。
GPartedを閉じる前に、次の点を確認してください:
- 512MBのFAT32 パーティションが存在する
- ラベルが EFI になっている
- フラグに boot, esp が表示されている
- 残りの領域がLinuxインストール用として確保されている(ext4はインストーラー内で作成されます)
ウィンドウの下部に次の表示があることを確認します:
0 operations pending(保留中の操作はありません)
これは、すべての変更が正常に適用されたことを意味します。
すべて問題なければ、GPartedを閉じて次の手順へ進みます。
操作が正常に完了するまで待ちます。
✅ 確認ポイント #1 完了:
EFIパーティションが存在し、フラグが正しく設定され、「保留中の操作」がありません。
確認が終わったら、GPartedを閉じます。
フェーズB2 ― インストーラーを開始する(ガイド画面)
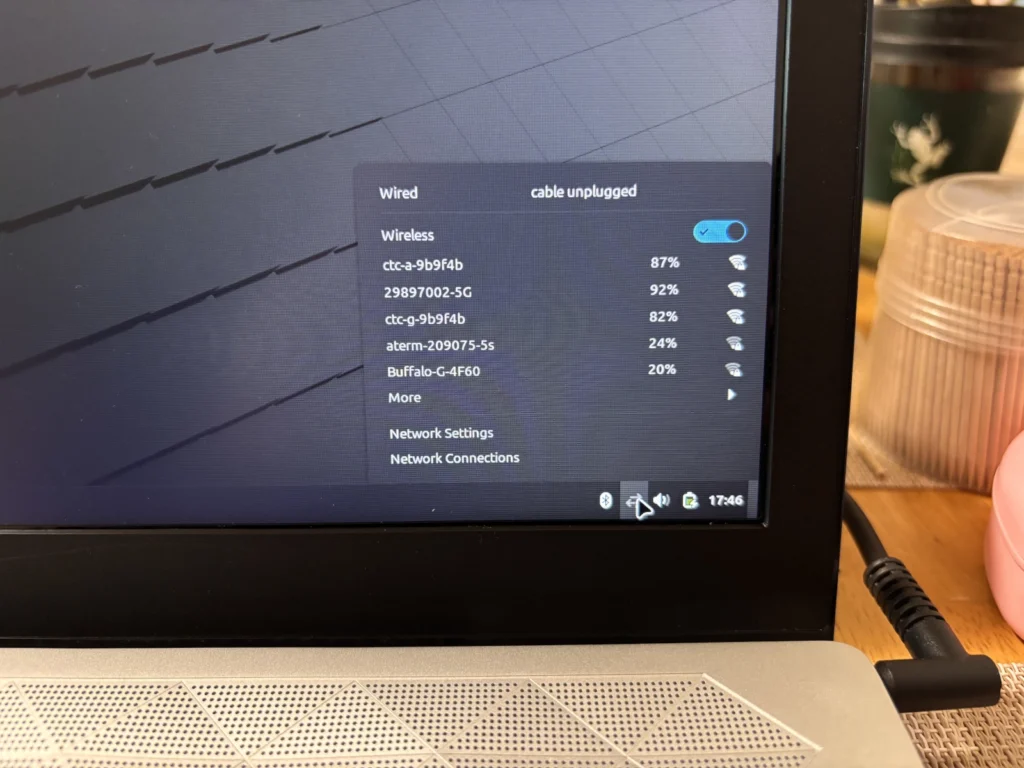
8)Wi-Fiに接続する(任意ですが推奨)
可能であればWi-Fiに接続してください。これにより、インストール中にLinux Mintがアップデート、ドライバー、マルチメディアコーデックをダウンロードできます。
Wi-Fiが利用できない場合でもインストールは続行できますが、アップデートや一部のドライバーは後からインストールする必要があります。
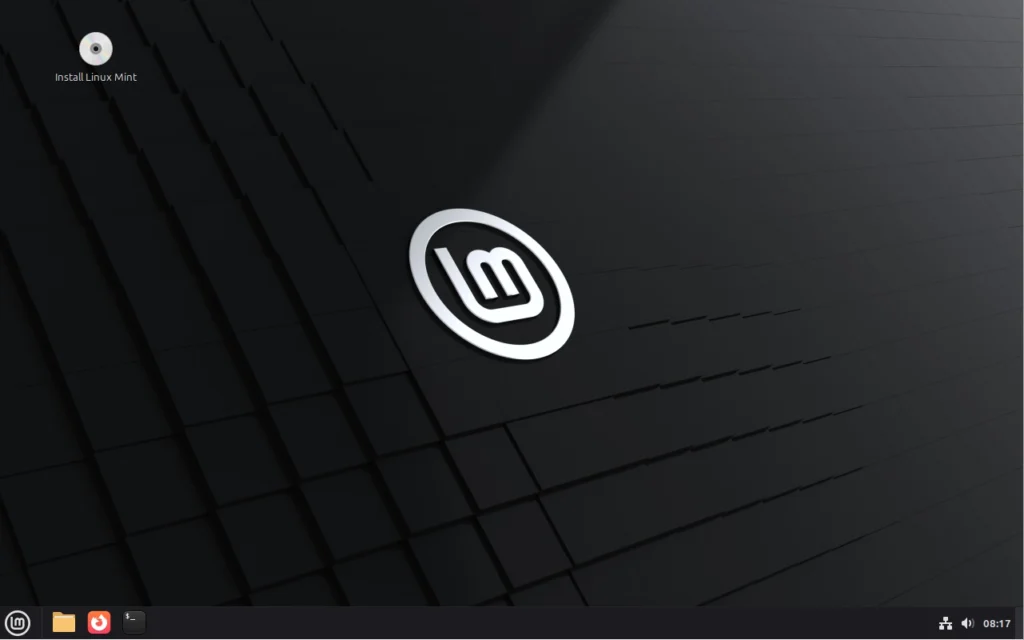
9)インストーラーを起動する
ライブUSBのデスクトップ画面で、左上にある Install Linux Mint のCDアイコンをダブルクリックしてインストーラーを起動します。
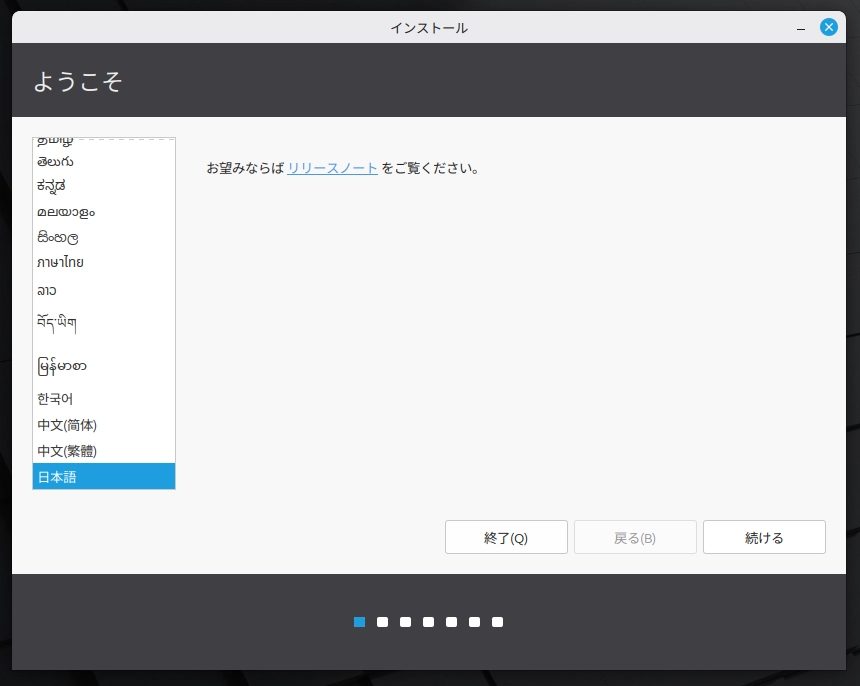
10)言語を選択する
11)キーボードレイアウトを選択する
12)マルチメディアコーデックを有効にする
日常的な動画や音楽の再生のために、「マルチメディアコーデックをインストール」 にチェックを入れることをおすすめします。
フェーズB3 – 手動でインストール先を選択する
13)「それ以外」を選択する
「インストールの種類」で次を選択します:
それ以外
これにより、パーティション構成やブートローダーのインストール先を手動で設定できるようになります。
14)EFIパーティションを選択する(フォーマットしない)
GPartedで作成した既存のEFIパーティションを選択し、**「変更…」**をクリックします。
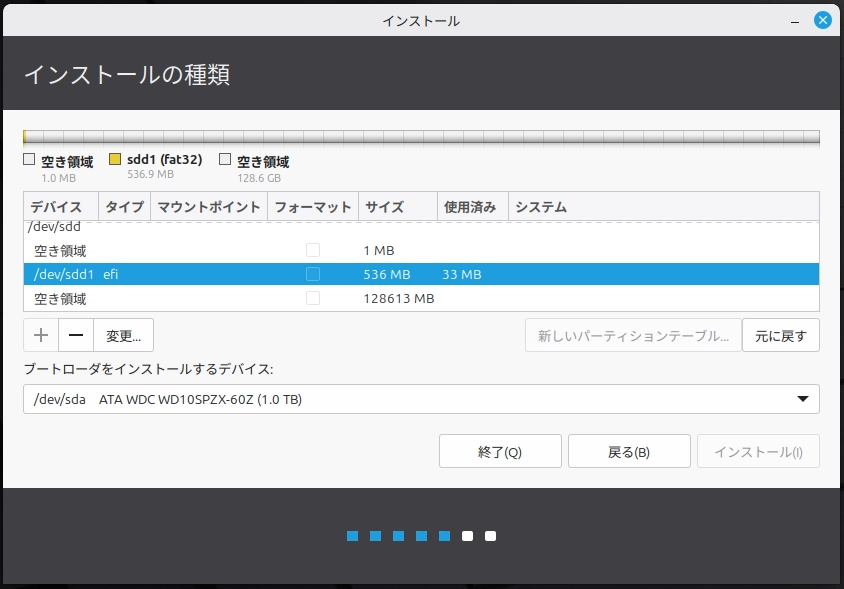
次のように設定します(画面上の英語ラベルに従ってください):
- 利用方法:EFI System Partition

- フォーマット:❌ 「フォーマット」はチェックしない (このパーティションはすでにGPartedで作成・フォーマット済みです)
- 「OK」をクリック
15)メインのLinuxパーティションを作成する(ext4、マウントポイントは /)
残りの空き領域を選択し、「+」をクリックしてメインのLinuxパーティションを作成します。
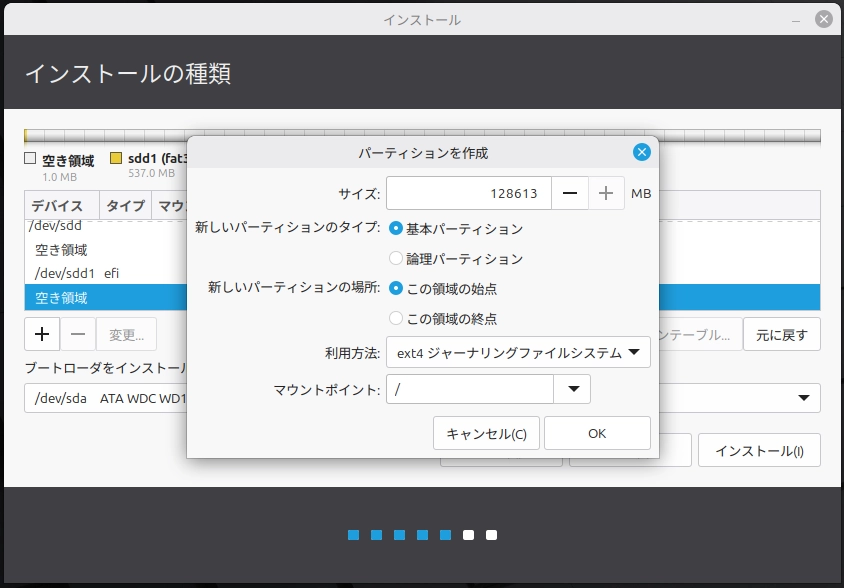
設定:
- 利用方法:Ext4 ジャーナリングファイルシステム
- マウントポイント:
/ - 新しいパーティションのタイプ:基本パーティション
新しいパーティションの場所:この領域の始点
フォーマット(パーティションの初期化)は、外付けSSD上のLinuxパーティションのみに適用してください。
重要:
✅ フォーマット(パーティションの初期化)するのは、外付けSSD上のLinux(ext4)パーティションのみです。
❌Windowsのパーティションや内蔵ドライブのパーティションは絶対にフォーマットしないでください。
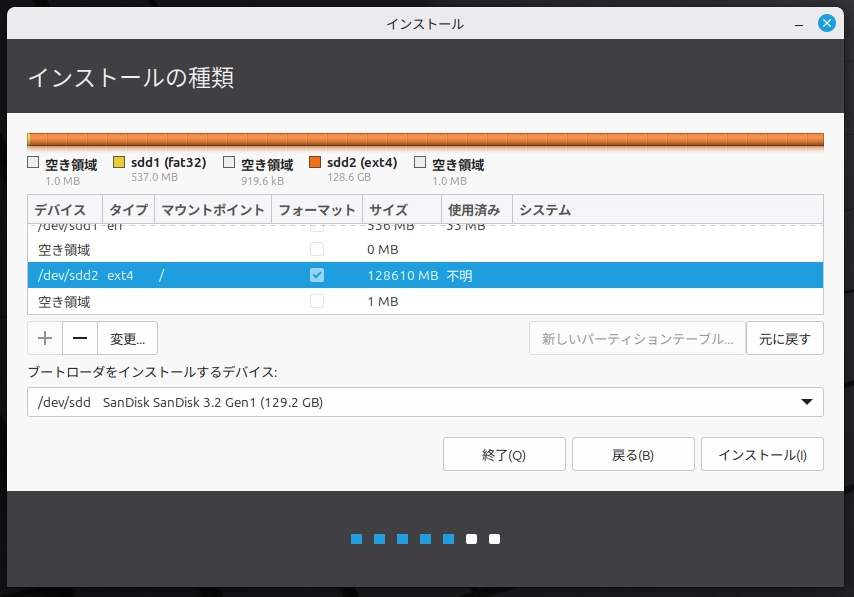
✅ 重要な手順:「ブートローダーをインストールするデバイス」を外付けSSD全体に設定する
この画面の下部に、次のドロップダウンメニューがあります:
ブートローダーをインストールするデバイス
この設定は、起動時にコンピューターがLinuxを探す場所を決定します。
選択するもの(正しい例)
外付けSSD本体を選択します — 次のように表示される項目です:
/dev/sdc — SanDisk … (129 GB)- /dev/nvme1n1 —(外付けNVMeケース)
- /dev/sd a、b、c など —(外付けドライブの名前/容量)
**末尾が数字で終わってはいけません。**
選んではいけないもの(誤り)
次のようなパーティションは選ばないでください:
- /dev/sdc1(EFIパーティション)❌
- /dev/sdc2(Linux ext4パーティション)❌
- 末尾が 1、2、3 などの数字で終わるもの❌
ドライブ全体ではなくパーティションを選択すると、インストールは成功しても起動に失敗する可能性があります。
最終確認
「インストール」をクリックする前に、次の2点を確認してください:
- ドロップダウンに外付けドライブのモデル名/容量(例:SanDisk 128GB、Samsung T7 1TB など)が表示されていること
- 選択されているデバイスがディスク全体であること(例:/dev/sdd であり、/dev/sdd1 ではない)
ドロップダウンに内蔵のWindowsドライブ(多くの場合いちばん容量が大きいもの)が表示されている場合は、先に修正してから進んでください。
注意: ドライブ名はシステムによって異なる場合があります(例:/dev/sda、/dev/sdb、/dev/sdc など)。アルファベットだけで判断せず、容量や(表示されている場合は)モデル名(例:「SanDisk 128GB」)で正しいドライブを確認してください。
16)「インストール」をクリックした後の確認
これは2回目の確認ポイントです。
「インストール」をクリックすると、インストーラーは確認画面(通常「ディスクに変更を書き込みますか?」というタイトル)を表示し、次の内容が一覧で表示されます:
- どのディスクが変更されるか
- どのパーティションがフォーマット(初期化)されるか(通常は新しいext4のLinuxパーティション)
「続ける」,をクリックする前に、次の点を確認してください:
- 変更対象として表示されているディスクが外付けSSDであることを確認してください(/dev/sdX だけでなく、容量やモデル名で確認すること)。
- 「フォーマット(初期化)される」と表示されているのが、外付けSSD上のLinux ext4パーティションのみであることを確認してください。
- 内蔵のWindowsドライブのパーティションが一覧に含まれていないことを確認してください。
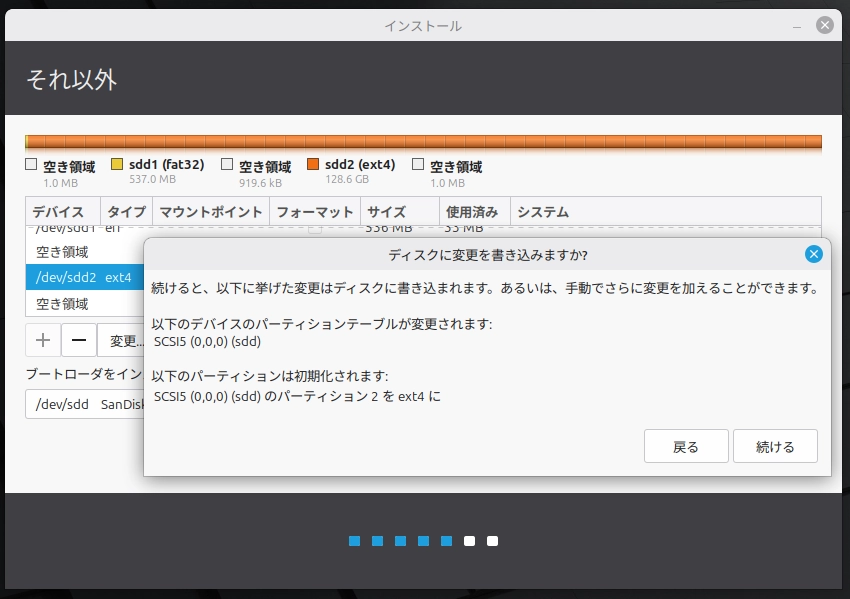
✅ 確認ポイント #2 完了: 正しい外付けディスクが対象になっており、指定したLinuxパーティションのみが初期化(フォーマット)されます。
フェーズ B4 – 最終設定とインストール
17)地域/タイムゾーンを選択
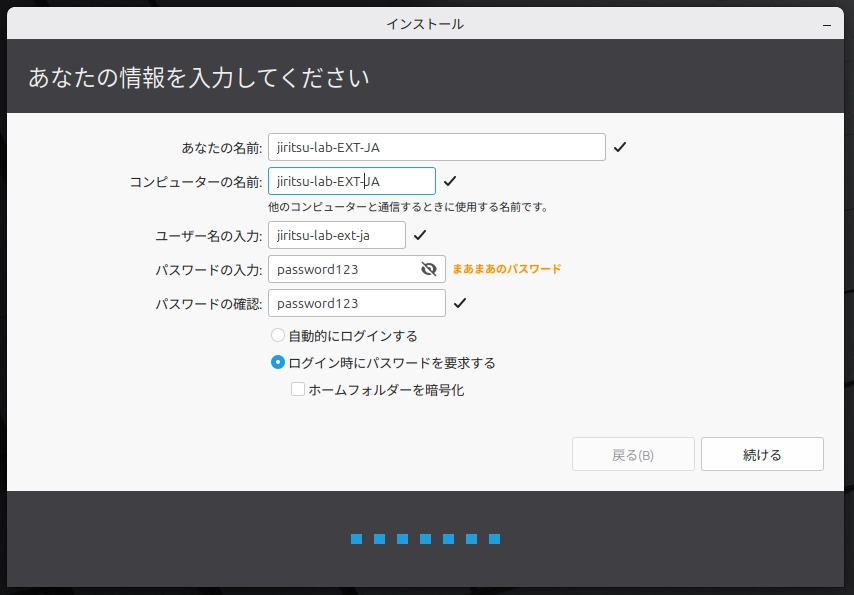
18)ユーザー名とパスワードを作成
アカウント情報とログイン設定を入力します。
この画面では:
- あなたの名前 — システム内で表示される名前です。
- コンピューター名 — ネットワーク上でこのデバイスが表示される名前です(提案されたままで構いません)。
- ユーザー名 — ログイン時に使用され、ファイルパス(例:/home/username)にも表示されます。
- パスワード — ログインや管理作業に必要です。
推奨設定
- 「ログイン時にパスワードを要求する」 を選択します(セキュリティのため推奨)。
- 特別にディスクのプライバシー保護が必要でない限り、「ホームフォルダーを暗号化する」 はチェックしないでください。
注意:Linuxでは、アカウントのパスワードは多くのユーザーが思うより頻繁に使用されます(ソフトウェアのインストールやシステム変更の際など)。そのため、安全で覚えやすいものにしてください。
入力が完了したら、「続ける」をクリックします。
19)インストール完了後に再起動
インストールが完了したら、「今すぐ再起動」をクリックします。
システムのシャットダウンが開始されます。 指示が表示されたら、Linux MintのUSBドライブを取り外し、Enterキーを押します。
コンピューターが再起動します。
外付けSSDにインストールしている場合は、システムがそこから起動できるように、外付けドライブを接続したままにしてください。
再起動後、Linux Mintのログイン画面が表示されます。
20)外付けSSDから起動し、ログイン成功を確認する
再起動後、コンピューターはデフォルトでWindowsに起動する可能性が高いです。
Boot Menu(例:F12、Esc など)を開き、外付けSSDを手動で選択します
起動デバイスを選択する際、外付けSSDが「Linux Mint」と表示されない場合があります。ドライブのメーカー名/モデル名、UEFI USBエントリー、または ubuntu と表示されることもあります。名前/ブランド、または容量が一致する外付けドライブのエントリーを選択してください。
Linux Mintのログイン画面が表示されたら、左上に表示されているコンピューター名を確認してください。
その名前は、インストール時に入力したコンピューター名と一致しているはずです。
名前が一致していれば、次のことが確認できます:
- システムが外付けSSDから起動していること
- インストールが正常に完了したこと
- 内蔵のWindowsドライブが変更されていないこと
選択したコンピューター名が表示されるログイン画面が確認できれば、Path Bの最終確認となります。
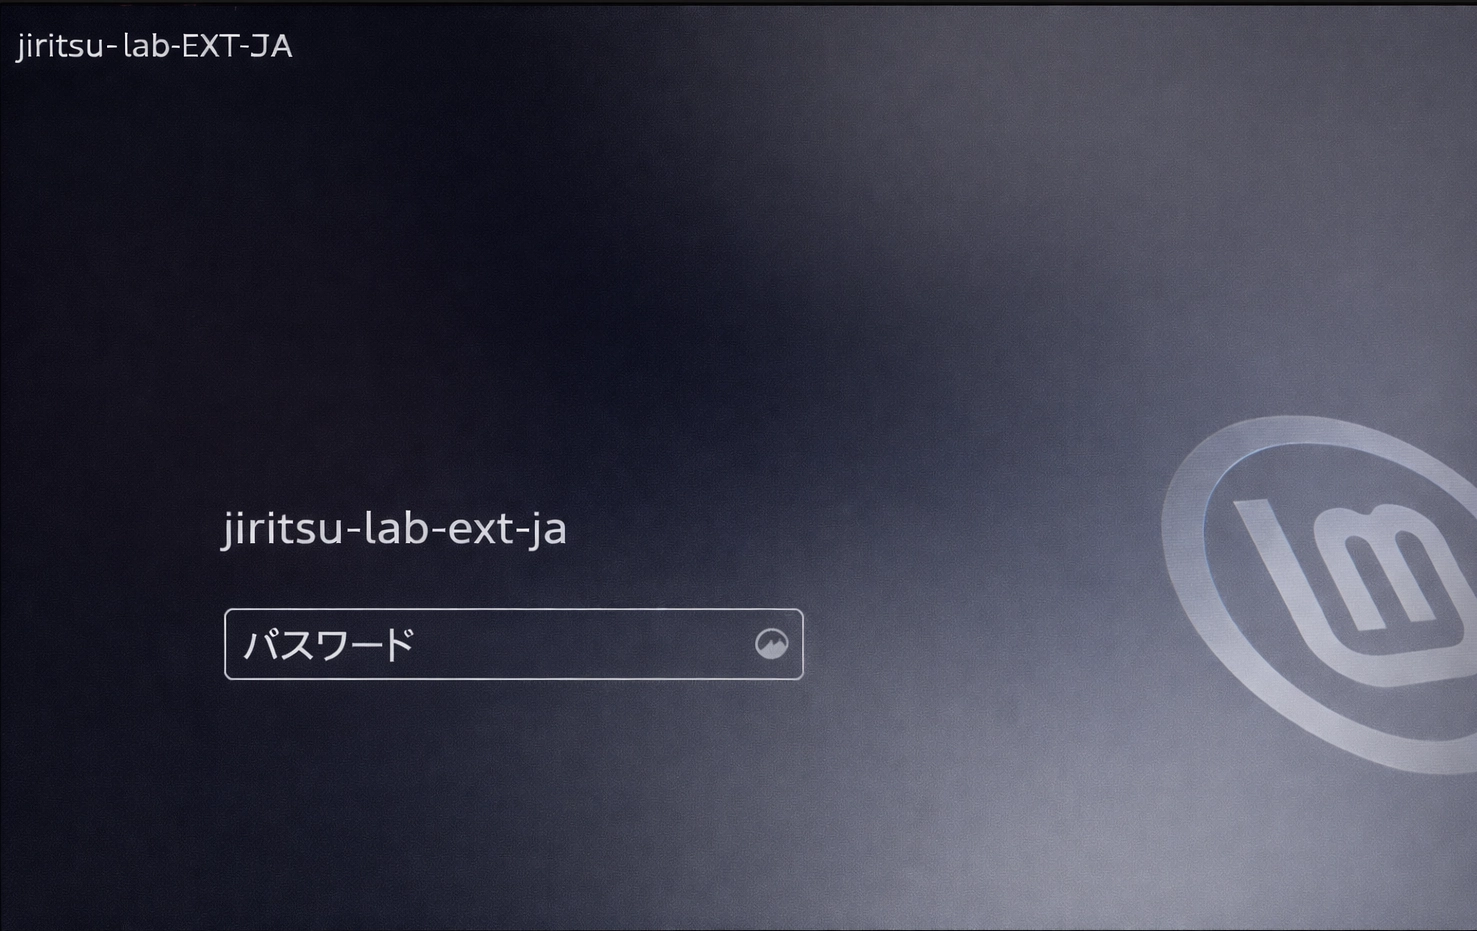
✅ 確認ポイント #3 完了:Linux が外付けSSDから起動しています。
重要な確認ポイント
- パーティションを作成する前に、GPartedで正しい外付けドライブが選択されている
- インストール開始前に、ブートローダーのインストール先が外付けSSDに設定されている
- 再起動後、外付けSSDから起動するとLinux Mintのログイン画面が表示される
■ここで一度停止できます(インストール完了)
外付けSSDから起動したときに Linux Mint のログイン画面 が表示されていれば、インストールは正常に完了しています。
この時点で作業は完了です。 ここでいったん終了しても問題ありません。
現在の状態は次の通りです。
- Linux は外付けSSDにインストールされています
- 内蔵ドライブの Windows には変更は加えられていません
- ブートメニューから、起動するシステム(Linux または Windows)を選ぶことができます
- 今日これ以上作業する必要はありません
もし外付けSSDを取り外してパソコンを再起動すると、これまで通り Windows がそのまま起動します。
ここで少し時間をとって、すべてが正常に動いているか確認してみてください。
Linux にログインして試してみてもよいですし、電源を切って後で続けても大丈夫です。
急いで次に進む必要はありません。
準備ができたら 「Mode 5|Linux の初期セットアップ」 に進み、日常的な使い方の基本や Linux Mint の簡単な使い方を学びましょう。