Install Linux on Old Windows 10 PC: Step-by-Step Guide for 2026
Executive summary: Windows 10 reached end of support on October 14, 2025. That means no more free security updates. Your PC may still work, but using it online becomes progressively riskier.
Many older machines cannot upgrade to Windows 11 because of TPM 2.0, Secure Boot, or other hardware requirements.
Installing Linux is a practical way to keep older devices useful – especially when budget, e-waste, or “the PC still works fine” are real concerns.
Linux Mint (Xfce edition) runs comfortably on 4GB RAM and remains workable on 2GB with realistic expectations.
This guide walks you through a low-risk workflow: back up first, create a verified USB, test Linux live, then install using a conservative method (external SSD or dual boot).
Safe workflow (low risk):
- Back up your important files
- Download Linux Mint + verify the ISO
- Create your bootable USB (Etcher)
- Try Linux without installing (live session)
- Install using the safest method (external SSD first)
→ [Mode 1 — Create a Linux Mint Bootable USB]
→ [Mode 2 — Try Linux Without Installing]
Why You May Need to Install Linux on an Old Windows 10 PC
Windows 10 reached end of support on October 14, 2025. In practical terms, that means no more free security updates, fixes, or technical support from Microsoft for Windows 10. Your PC may keep working, but – as Microsoft explicitly warns – without ongoing security updates, it becomes more exposed to malware and other attacks over time.
End-of-support doesn’t make a device instantly unusable. It means newly discovered vulnerabilities are no longer patched. Over time, that increases exposure – especially for an internet-connected PC used for email, banking, or cloud logins.
Why not just upgrade to Windows 11?
For a large share of older Windows 10 PCs, Windows 11 is blocked by hardware requirements. Official minimum requirements include 4GB RAM, 64GB storage, UEFI firmware with Secure Boot capability, and TPM 2.0. Microsoft also states TPM 2.0 is required for Windows 11 and positions it as foundational for multiple security features. Industry reporting has further emphasized that Microsoft has publicly framed TPM 2.0 as “non-negotiable,” reinforcing that many older PCs will be left behind.
If your hardware can’t clear those checks (or you don’t want to fight workarounds), you essentially have three realistic paths:
1) Replace the PC with newer hardware that supports Windows 11.
2) Enroll in Windows 10 consumer Extended Security Updates (ESU) for a limited time window.
3) Install an actively supported operating system. Linux is the most common choice for extending life on older PCs.
What about Windows 10 ESU?
Microsoft’s consumer ESU program is explicitly designed as a “more secure option” for staying on Windows 10 temporarily while transitioning. It provides only “critical and important” security updates (no new features, no non-security fixes, and no technical support). The consumer ESU program can be used until October 13, 2026, and it requires Windows 10 version 22H2 plus other prerequisites. Microsoft also states ESU can be obtained via multiple enrollment methods, including a one-time $30 USD purchase (plus applicable tax), and the license can be used on up to 10 devices.
That said, ESU is fundamentally a short runway. If you want a long-term solution for an older machine that still has usable hardware, Linux is the option that typically gives you ongoing security updates and modern software without requiring new hardware.
Can Your Old Windows 10 PC Run Linux?
The short answer is: in most cases, yes – but the experience depends heavily on RAM, storage type (SSD vs HDD), and which Linux desktop environment you choose.
To ground this in documentation and benchmarks, it’s useful to compare three layers:
- OS requirements (what the installer and desktop need to run)
- Desktop environment footprint (how much RAM is consumed just “idling”)
- Real workload (web browser tabs, video calls, office apps)
Baseline: what Windows expects vs what Linux can do
Microsoft lists Windows 10’s basic minimum RAM as 2GB for 64-bit (and 1GB for 32-bit). In practice, modern browsing and security tooling can push older systems into memory pressure quickly, especially on 2GB machines. (This is one reason many people start looking for alternatives after end of support.)
On the Linux side, our recommendation is simple:
- Linux Mint: 2GB RAM minimum (4GB recommended for comfortable use).
That’s why Linux Mint Xfce is our default for old Windows 10 PCs: it’s designed to stay responsive without demanding modern hardware.
The RAM question: what happens at 4GB vs 2GB?
If your PC has 4GB RAM
This is the “comfortable” zone for Linux Mint (Xfce) on an older computer.
You should be able to do normal everyday tasks without thinking about RAM at all:
- Web browsing (a reasonable number of tabs)
- YouTube and streaming
- Email, documents, and printing
- Zoom calls
If your PC feels slow on Windows 10, Linux Mint often feels noticeably lighter simply because it runs fewer background services.
If your PC has 2GB RAM
Linux can still work – but you need the right expectations.
The biggest challenge is not the operating system.
It’s modern web browsing.
On 2GB RAM, your PC will feel fine for:
- Light browsing (a few tabs)
- Basic documents
But it may feel slow if you try to do “modern heavy browsing” like:
- Lots of tabs
- YouTube + other apps open
- Heavy websites (Facebook, maps, shopping sites, etc.)
This is why we recommend the Xfce edition of Linux Mint for older PCs.
It’s designed to stay lightweight and responsive.
Most importantly:
Try Linux from the USB first.
Try Linux Without Installing (Recommended)
Trying Linux “live” from the USB is the safest first step.
It lets you test your computer before you make any permanent changes.
In the Linux Mint boot menu, choose “Start Linux Mint” to launch a temporary session from the USB.
In the live session, quickly check:
- Wi-Fi connects normally
- Sound works (play a YouTube video)
- Display looks correct (brightness and resolution)
- Keyboard + trackpad/mouse feel normal
- Sleep / wake works (optional, but useful)
A live USB session can feel a little slower than a full install (because it’s running from the USB). That’s expected.
If everything works here, it’s a strong sign Mint will work well after installation, especially on an SSD.
What You Need Before You Install Linux
A short checklist before you begin.
Preparation checklist (use this before you touch partitions)
| Item | Why it matters | Minimum spec / best practice |
| External storage for backup | Reduces the single biggest risk: data loss | Back up to cloud storage or external USB drive |
| A USB flash drive | Required to boot and test Linux | 4GB+ is workable for some images, but 8–16GB is safer for modern ISOs |
| A Linux ISO from an official source | Avoids corrupted downloads and supply-chain risk | Download from the official Linux Mint page or official mirrors |
| Verify the ISO checksum | Prevents “mysterious install failures” due to a bad download | Check SHA256/SHA sums provided by the project |
| Know your target install method | Determines how risky the install is | External SSD (lowest risk), then dual boot, then full replacement |
| Expectation setting for low-RAM PCs | Prevents disappointment | On 2GB RAM, reduce browser tabs, consider SSD upgrade |
Back up your important files first
Before installing Linux, make sure your important files are saved somewhere safe.
The simplest options are:
- Google Drive (if you use Gmail)
- OneDrive (if you use a Microsoft account)
- Or copy your important folders to an external USB drive
At minimum, make sure your Documents, Desktop, and Pictures folders are backed up.
Once your files are safe, you can continue with confidence.
**Always back up your important data before making any major changes or installing firmware: you can do that while you decide which install method to proceed with.
[ Mode 3 – Choosing how to install Linux Mint ]
Decide your install approach before you boot anything
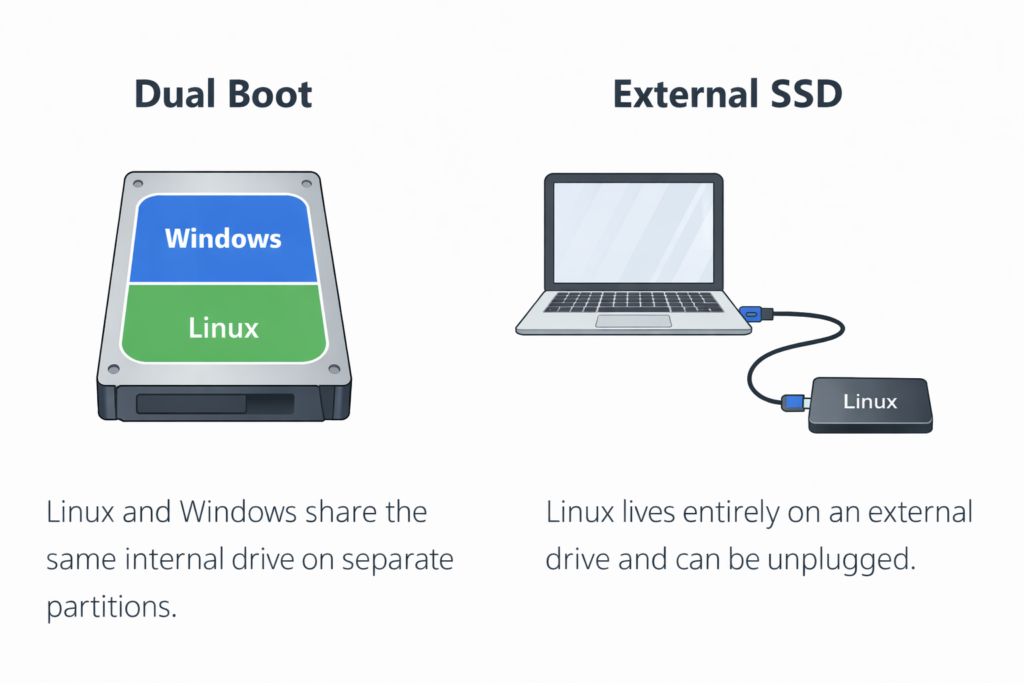
Installing Linux is not one single action; it’s a choice among three strategies: The start guide on this site follows two methods with screenshots and step by step instructions – 1. External SSD and 2. Dual boot installations.
- External SSD install (recommended when you cannot risk the internal drive): install Linux to an external SSD, leaving the internal Windows disk untouched. This is the safest “first install” mindset.
- Dual boot: shrink Windows partition and install Linux alongside, choosing OS at startup.
- Replace Windows entirely: erase disk and install Linux. Only do this when backups are verified.
[ Mode 4 – Install Linux Mint ]
Create a Bootable Linux USB
This section is where most people either (a) succeed quickly or (b) get stuck because of a corrupted ISO or a mistaken USB selection. If you have decided to give Linux Mint a try, you can follow the link here and check our our guide on how to create a Linux Mint Bootable USB.
Recommended USB Drive (optional)
To create a Linux Mint bootable USB, you’ll need a reliable flash drive.
While 4GB can work for some older images, 8–16GB is safer for modern ISOs and gives you fewer write errors.
We recommend using a dependable USB 3.0 drive for faster flashing and smoother boot performance.
→ SanDisk 16GB Ultra USB 3.0 Flash Drive (affiliate link)
A good USB drive reduces failed flashes, corrupted writes, and mysterious boot issues, especially on older Windows 10 machines.
The boot flow (what you’re trying to achieve)
Conceptually, the goal looks like this:
Windows 10 PC → BIOS/UEFI boot menu → USB boots Linux “live environment” → you choose “Try” or “Install”
This is why verifying the ISO matters: a single bad bit in the image can lead to failed boots or failed installs, and authenticity check confirms that the ISO image you downloaded was “signed by Linux Mint, and thus that it isn’t a modified or malicious copy made by somebody else“.
Download and verify the Linux Mint ISO (recommended)
- Download Linux Mint from the official Linux Mint download page (or one of their official mirrors).
- On the same download page, find the SHA256 checksum for the exact ISO you downloaded.
- Verify that your downloaded file matches the published checksum.
Why this matters: a corrupted download is one of the most common reasons a USB installer fails or “acts weird.” Verification is a quick check that prevents wasted time later.
Write the USB using Balena Etcher (recommended)
This guide uses Balena Etcher because it’s simple, consistent, and works the same way for most people.
Before you start: Please acknowledge that everything on the USB will be erased.
- Insert your USB flash drive.
- Open Balena Etcher (run as administrator).
- Click Flash from file → select your Linux Mint ISO.
- Click Select target → choose your USB drive (double-check the size/name).
- Click Flash and wait for it to finish.
- When Etcher says it’s complete, safely eject the USB.
That’s it. Your bootable USB is ready. If you would like to follow a careful step by step guide with helpful screenshots and other tips, click the link below.
Install Linux Safely (Best Method for Old PCs)
The safest installation is the one that is easiest to undo.
Below are three installation modes, ordered by risk:
Method A: Install to an external SSD (recommended)
This is the “leave the internal Windows disk alone” strategy. It’s ideal when:
- The PC contains data you cannot afford to lose
- You’re new to Linux
- You want the option to unplug the Linux drive and return to Windows instantly
With an external SSD install, your Windows drive is left untouched by default. Linux Mint is installed onto a separate drive, which makes this method the easiest to undo if you ever change your mind.
Recommended hardware (optional):
If you’re using the external SSD method and don’t have a drive yet, we recommend a reliable portable SSD. A fast SSD makes Linux feel smoother and keeps this installation method easy to undo later.
→ SanDisk 1TB Extreme Portable SSD (affiliate link)
High-level steps (Linux Mint — External SSD method)
- Connect your external SSD (USB 3.0 if possible).
- Boot from your Linux Mint USB and choose “Start Linux Mint.”
- On the desktop, click Install Linux Mint.
- When asked about installation type, choose “Something else.”
This allows you to manually select the correct drive. - In the partition list:
- Identify your external SSD by its size and brand name.
- Create or use an existing EFI System Partition (FAT32) on the external drive (if needed).
- Create a root partition (
/) formatted as ext4 on the external SSD.
- At the bottom of the installer window, confirm that the bootloader installation device is set to the external SSD — not the internal Windows drive.
- Proceed with installation and reboot when prompted.
- Use your computer’s boot menu to select the external SSD when you want Linux.
→ [Mode 4 — Full Step-by-Step Install Linux Mint Guide]
Method B: Dual boot (Windows + Linux)
Dual boot is useful if you still need one or two Windows-only applications but want Linux Mint as your main system.
With dual boot, Linux Mint is installed alongside Windows on the same internal drive. When you start your computer, you’ll see a menu that lets you choose which system to load.
High-level steps (Linux Mint — Dual Boot)
- Back up your files first. (Non-negotiable.)
- Boot from your Linux Mint USB and choose “Start Linux Mint.”
- Click Install Linux Mint.
- If available, choose the option to “Install Linux Mint alongside Windows.”
- The installer will automatically shrink the Windows partition and create space for Linux.
- Allocate space to Linux.
- More space = fewer headaches later.
- 40–80GB is a comfortable starting range for most users.
- Complete the installation and reboot.
After restart, you should see a boot menu allowing you to choose Linux Mint or Windows.
Important note
Dual boot modifies your internal drive’s partitions. The installer handles this safely in most cases, but mistakes are possible – which is why backups matter.
If you want the safest first experience, consider the external SSD method instead.
For a detailed guide with screenshots → [Mode 4 — Install Linux Mint (Full Guide)]
Method C: Replace Windows completely (erase disk)
This is the simplest long-term setup – but it is also the most destructive.
In the Linux Mint installer, this option is labeled “Erase disk and install Linux Mint.”
If you choose this, everything on the selected drive will be deleted and replaced with Linux Mint.
High-level steps (Linux Mint — Erase Disk)
- Confirm your backups are complete and restorable.
Open a few files from your backup to make sure they actually work. - Boot from the Linux Mint USB and click Install Linux Mint.
- Choose “Erase disk and install Linux Mint” only if you are completely certain.
- (Optional but recommended for laptops) Enable full-disk encryption if you want added protection.
- If you enable encryption, write down your passphrase and store it somewhere safe.
- If you lose the passphrase, your data cannot be recovered.
- Complete the installation and reboot.
When does Mode C make sense?
- You no longer need Windows
- The PC is dedicated to Linux
- You want the cleanest, simplest setup and installation process.
If you’re unsure, the external SSD method is safer for a first experiment.
What Happens to Your Files after Installing Linux?
Your files are safe only if you choose a safe install path
- If you install Linux to an external SSD, your internal Windows drive (and its files) remain untouched unless you explicitly modify it.
- If you dual boot, the installer modifies partitions; mistakes are rare but possible, and backups are the correct mitigation.
- If you choose Erase disk, Linux Mint will delete everything on the drive you select and replace it with Linux. This can be the right choice on a dedicated drive, but only after you’ve backed up your files and double-checked you’re erasing the correct disk.
Is Linux Worth Installing on an Old Windows 10 PC?
If your PC still boots, has usable hardware, and simply got stranded by Windows 10 end of support or Windows 11 requirements, Linux is often worth it for three reasons: security continuity, cost control, and device longevity.
Security and support continuity (the core reason)
Microsoft’s position is clear: Windows 10 still functions, but Microsoft no longer provides security updates or fixes, increasing malware risk. In parallel, U.S. government guidance explains that end-of-support tech becomes vulnerable because manufacturers stop monitoring and patching vulnerabilities, and adversaries exploit those gaps.
Linux does not magically eliminate risk, but it does give you a supported OS path where security updates continue without forcing a hardware refresh – especially when you pick an LTS-style distro and keep it updated.
Sources used:
https://www.ic3.gov/CSA/2026/260205.pdf
https://www.tomshardware.com/software/linux/best-linux-distros-for-reviving-an-old-pc
https://www.theverge.com/2024/12/4/24312928/microsoft-windows-11-older-hardware-tpm-support
https://linuxmint-installation-guide.readthedocs.io/en/latest/verify.html