Contents
Mode 1 – Preparation
(Nothing installed to the computer. One tool prepared. A Linux Mint bootable USB allows you to safely try or install Linux Mint without changing your current system.)
Who This Guide Is For
This guide is written for people who want to extend the life of their computer, but do not consider themselves particularly technical.
You do not need prior Linux experience.
You do not need to understand partitions, boot loaders, or system internals.
You only need to be comfortable following clear, step-by-step instructions.
Creating a bootable USB is a simple task for many experienced users.
If you are already comfortable downloading ISO files, flashing USB drives, or using similar tools, this mode may feel unnecessary.
If that describes you, you are free to skip ahead to the next mode.
However, this guide is intentionally written for people who:
- Rarely install software beyond normal programs
- Have never created a bootable USB before
- Feel cautious about changing how their computer works
- Want to avoid mistakes, even small ones
- Want all required tools and software clearly listed in one place
- Prefer a guide that explains common pitfalls and shows how to avoid them safely
If that sounds like you, you are in the right place.
Nothing in this mode installs Linux or changes your computer.
It exists to make sure everyone – regardless of technical background – can prepare safely and confidently before moving on.
You can stop at any point, skip ahead, or return later.
There is no pressure to continue beyond what feels comfortable.
A. What We’re Doing in This Mode
In Mode 1, we are doing one simple, safe thing:
We will create a USB “test drive” for Linux.
That USB will let you try Linux in Mode 2 without installing it. Think of it like borrowing a temporary operating system for a quick check- so you can see how it feels and confirm your computer works well with it before making any bigger decisions.
By the end of this mode, you will have:
- A USB flash drive that can start Linux temporarily (Mode 2). (The same USB can also be used later for installation, if you choose to continue.)
- The confidence that you’ve prepared everything correctly
- A clear stopping point (you can continue later whenever you like)
What we will do:
- Download a Linux ISO file (like downloading any large program)
- Install a small tool called Balena Etcher
- Use Balena Etcher to copy the Linux file onto the USB
That’s it. We are not installing Linux – we’re only preparing a test USB.
B. What This Will Not Change on Your PC
Mode 1 does not change Windows or your internal drive. You are only preparing a USB.
Specifically, Mode 1 will not:
- Delete or move your files (photos, documents, etc.)
- Modify Windows or uninstall anything
- Change your programs, settings, or passwords
- “Replace” Windows in any way
- Touch your internal drive (the place Windows is installed)
Even when we try Linux later (Mode 2), it is temporary. You will only be testing it.
C. What You’ll Need
Here is the full checklist for Mode 1. You don’t need anything special.
Required
- A USB flash drive (8 GB or larger)
- 16 GB is a comfortable choice, but 8 GB is usually fine
- The USB should be empty, or you should be okay erasing it
- A working Windows PC with internet access
- About 20–40 minutes of quiet time
- Most of this is waiting for downloads and the USB creation process
Strongly recommended
- Laptop users: keep your laptop plugged into power while creating the USB
- A second device (phone/tablet) to keep this guide open while you work (optional)
One important note about the USB
Creating a Linux USB will erase the USB drive. That’s normal. If there are any files on that USB you want to keep, copy them somewhere safe first.
When you have these items ready, continue to Section D.
D. Choosing the Right USB Drive
You do not need a special USB drive for this guide. The goal is simply to use a USB that is large enough and reliable, so the process feels smooth and predictable.
D1. Minimum Requirements (Quick Answer)
- 8 GB or larger is usually enough
- 16 GB is a comfortable “safe choice” if you’re buying one
- The USB should be empty or okay to erase
- Not physically damaged
- If you already have an 8 GB or 16 GB USB at home, that is almost always fine
D2. More Details (If Needed)
What kind of USB is best?
For beginners, the best USB is one that is:
- From a normal, well-known brand
- Not extremely old
- Not physically damaged
- Not used for important backups
You do not need to worry about speed numbers or technical specifications. Faster USB drives can be nicer, but they are not required.
Avoid these (to reduce frustration):
- USB drives that often disconnect or “wiggle” in the port
- A USB drive that contains your only copy of important files
- Very tiny “ultra-low profile” USB drives (harder to remove; sometimes less reliable)
About USB size and “too big”:
A larger USB (32 GB / 64 GB) is not a problem. It will still work.
Use an empty USB (see Section C).
A few recommendations (if you’re buying one):
For most people, a 8GB or 16GB USB 3.0 drive from a reputable brand is perfect for creating a Linux Mint boot disk.
USB drive examples (optional):
If you don’t already have one, the examples below meet the requirements and are known to work reliably. Jiritsu-Lab uses Sandisk and Buffalo USB drives and Sandisk external SSD’s for all installations and demonstrations on this site.
A dependable, inexpensive option with comfortable space for Linux boot media.
The 3-pack is practical if you want:
- One Linux Mint installer
- One Windows recovery disk
- One spare backup copy of Windows 10 or 11
A compact, metal-body USB drive that feels solid and durable in hand.
16GB is more than enough space for a Linux Mint installer and leaves comfortable headroom for updates or alternative ISO files.
Why 16GB? Linux Mint ISOs are usually around 2–3GB, but using a 16GB drive avoids tight space issues and ensures compatibility with future versions.
This model is:
- Affordable and widely available
- USB 3.0 (faster write speeds than older USB 2.0 drives)
- Durable metal housing (less flex and cracking than thin plastic models)
If you just need one reliable drive for creating your Linux boot disk, this is a simple, dependable choice.
A practical two-drive bundle that covers both sides of the installation process.
Each 8GB drive is large enough for a Linux Mint installer (Mint ISOs are typically around 2–3GB), making this an affordable and sufficient option.
The 2-pack is ideal if you want:
- One USB for your Linux Mint installer
- One USB for Windows recovery or important file backups
While this model uses USB 2.0 (slower than USB 3.0), speed is not critical for creating or booting a Linux installer. For most users, reliability and simplicity matter more.
If your goal is a safe, organized setup with a clear “installer drive” and a separate “backup drive,” this bundle makes that easy.
*Disclosure: Purchases made through these links may generate a small commission for Jiritsu Lab, at no extra cost to you. This supports the website and the continued development of educational resources.
When you have your USB ready, continue to Section E.
E. Downloading the Linux File (ISO)
In this section, you will download one file from the official Linux Mint website. This file is called an ISO (pronounced “eye-so”). It is the file we will use to create your Linux USB in the next sections.
Goal of this section:
By the end, you will have a Linux Mint ISO file saved on your computer (usually 2–4 GB).
Step 1: Open the official Linux Mint download page
Open your web browser and search for:
- Linux Mint 22.3 zena download

Click the result that is clearly the official Linux Mint website (linuxmint.com).
If you see results marked “Ad”, skip those.
Step 2: Choose the edition (use Cinnamon)
On the download page, you will usually see a few editions. For this guide, choose:
- Cinnamon
This version is the most familiar for Windows users and is the easiest to follow in a beginner guide.
Step 3: Click the mirror labeled “World”
After you choose Cinnamon, you will see a list of download options (mirrors).
To keep this simple and avoid confusion:
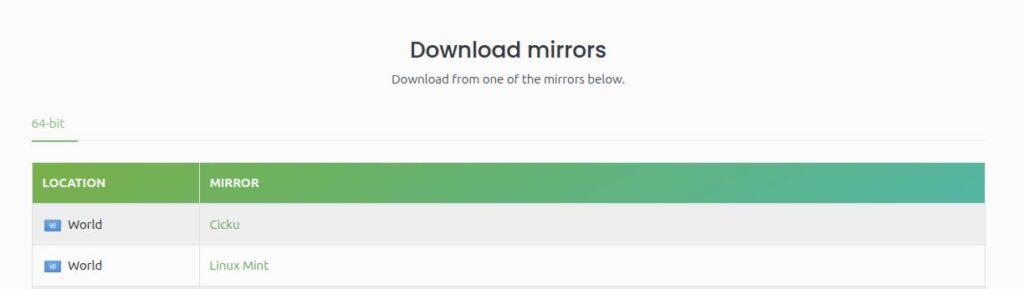
- Click the mirror labeled “Linux Mint” next to the “World” location, (this automatically chooses a fast download server for you)
Step 4: Wait for the download to finish
The file is large (usually 2–4 GB), so it may take time depending on your internet. This is normal.
While it downloads:
- Do not restart your computer
- If you are on a laptop, keep it plugged into power if possible
Step 5: Find the file after it downloads
When the download finishes, find where Windows saved it.
Most PCs save it in:
- Downloads
Look for a file name that includes linuxmint and ends with:
- .iso
Example (yours may be slightly different):
linuxmint-22.x-cinnamon-64bit.iso
If you don’t see “.iso” at the end, Windows may be hiding file extensions. That’s okay.
Step 6: Move the file to an easy folder (recommended)
To make the next steps simple, move the file somewhere easy to find.
A good option is to create a folder like:
C:\ISO
Then move the Linux Mint file into it.
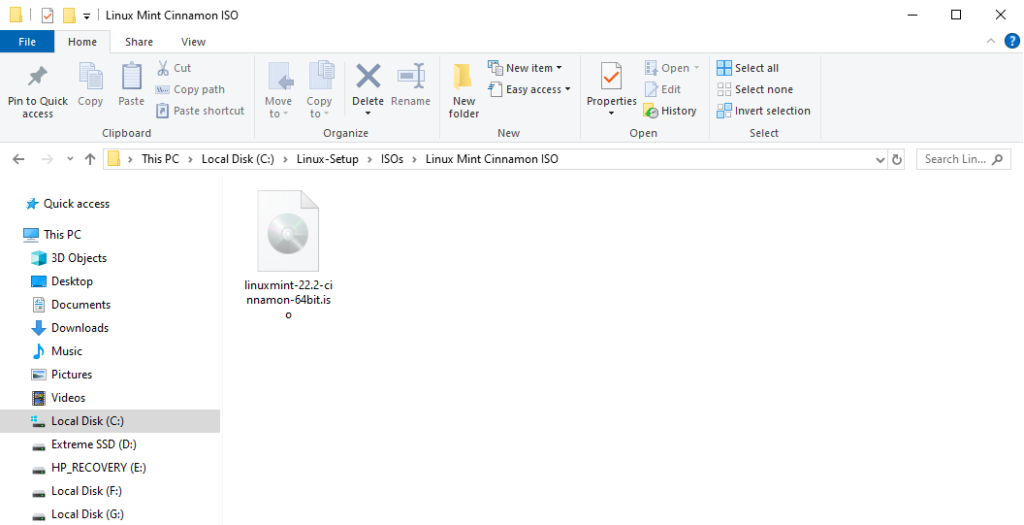
Continue when: the ISO file is saved somewhere you can find easily (example: C:\ISO).
Next, install Balena Etcher and create the USB.
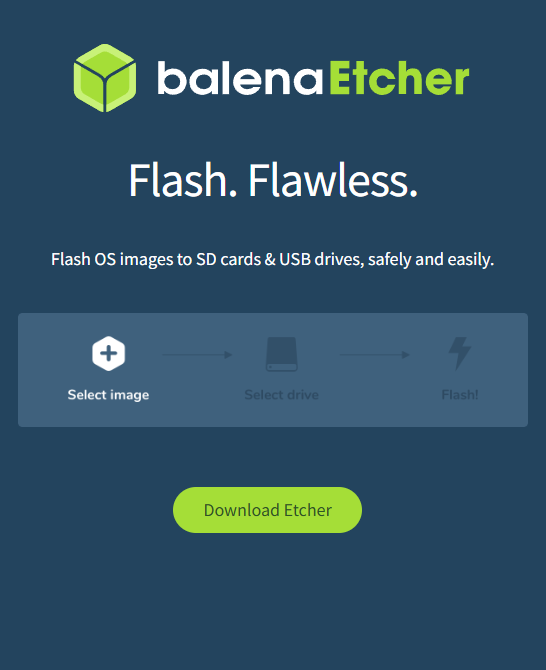
F. Installing Balena Etcher (USB Creator)
Balena Etcher is a small, reliable tool that turns your Linux Mint ISO file into a bootable USB. We use it because it is simple and beginner-friendly.
Important (please do this):
To avoid common permission problems in Windows, this guide will always run Etcher as administrator.
This is normal and safe. It simply gives Etcher permission to write to the USB correctly.
Goal of this section:
By the end, Etcher will be installed on your Windows PC and ready to use.
Step 1: Open the Etcher download page
In your web browser, search for:
- balena etcher download
Open the official Etcher page:
https://etcher.balena.io/
Look for a button that says:
- Download Etcher
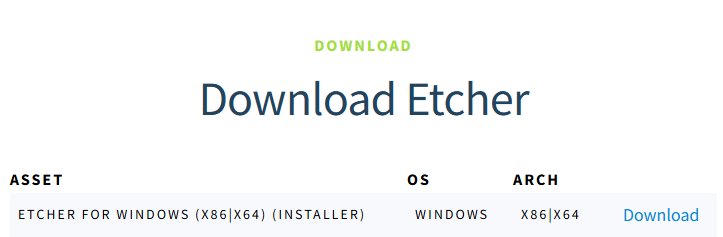
Step 2: Download the Windows installer
You will see a download list. Choose the Windows installer that looks like this:
- ETCHER FOR WINDOWS (x86|x64) (INSTALLER) → Download
Step 3: Run the installer
When the download finishes, open your ‘Downloads‘ folder and double-click the Etcher installer.
Windows may show a security message such as:
- “Do you want to allow this app to make changes to your device?”
If it does, choose:
- Yes
Then follow the on-screen steps to install Etcher. The default options are fine.
Step 4: Open Etcher (Run as administrator)
After installation, Etcher may open automatically. If it does, close it once.
Now, to follow this guide’s rule:
- Find the balenaEtcher icon (Desktop or Start menu)
- Right-click it
- Click Run as administrator
- If Windows asks for permission, click Yes
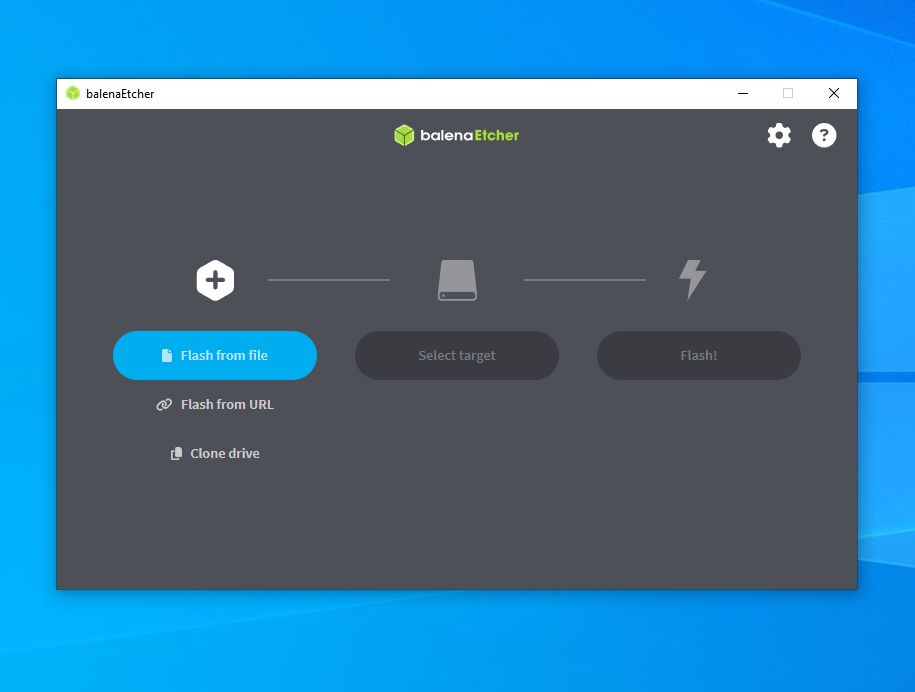
What you should see: a window with three buttons:
- Flash from file
- Select target
- Flash!
If you see these three buttons, continue to Section G.
G. Creating the Linux USB (Step by Step)
This is where you turn your downloaded Linux Mint ISO into a “try Linux” USB.
Goal of this section:
By the end, you will have a finished Linux USB that is ready for Mode 2 (test drive).
Before you start (30 seconds)
- You have the Linux Mint ISO file downloaded (from Section E)
- You have a USB drive plugged in
- If possible, unplug other external drives you don’t need right now (especially external SSDs)
- Not required, but it makes the next step safer and less confusing
Step 1: Open Etcher as administrator
Open balenaEtcher with a right-click and choose Run as administrator. You should see a screen like this:
Step 2: Click “Flash from file”
Click:
- Flash from file
Etcher will open a normal Windows file picker.
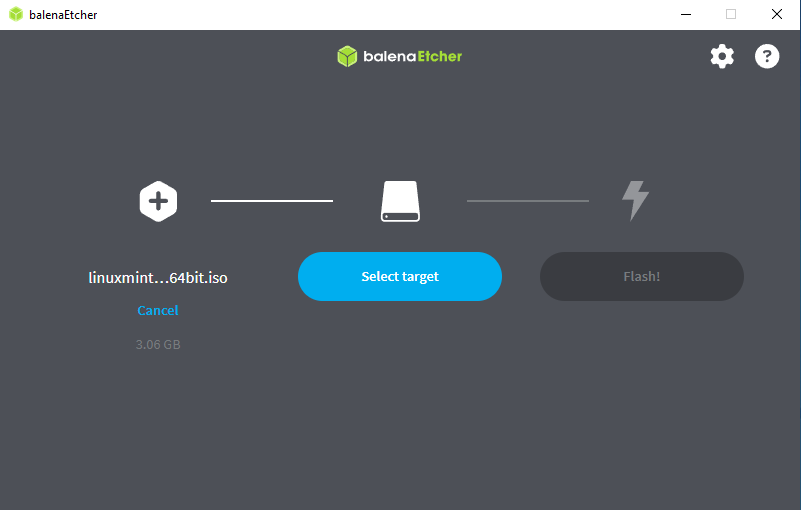
Step 3: Select your Linux Mint ISO file
Navigate to the folder where you saved the ISO (example: C:\ISO) and click the Linux Mint file.
It will look similar to:
linuxmint-...cinnamon-64bit.iso

After selecting it, you should return to Etcher and see the ISO name on the left.
Step 4: Click “Select target” (open the drive list)
Click:
- Select target
Etcher will show a list of drives. Before you click anything in that list, follow this rule:
Drive selection rule (read first):
- Choose: USB flash drive (usually 8–32 GB)
- Do NOT choose: large external drives (500 GB+), internal drive (C:)
- Not sure? Unplug other external drives, reopen Etcher, try again.
Step 5: Choose the USB drive (avoid large drives)
In the drive list, choose your USB drive.
In the example screenshot, Etcher shows:
- A large drive (example: “SanDisk Extreme… 1 TB” with a “Large drive” label)
- A USB flash drive (example: “BUFFALO USB … 15.5 GB”)
For creating the Linux USB, choose the USB flash drive (the smaller one).
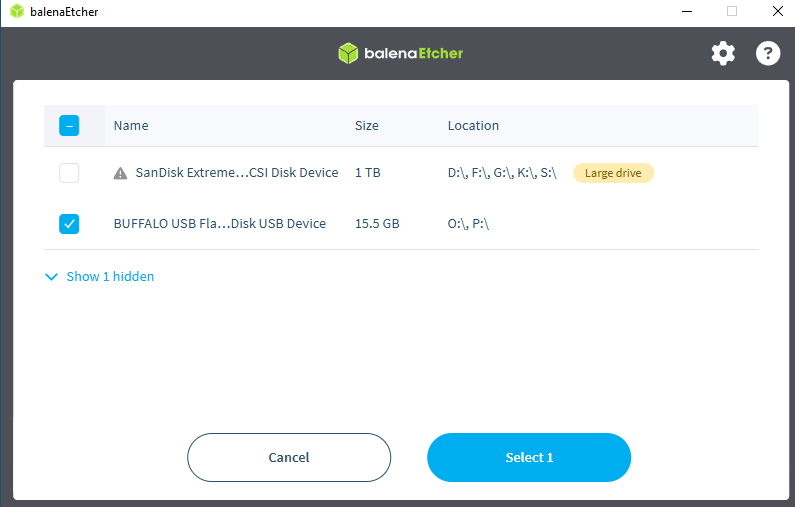
Then click:
- Select 1
Step 6: Click “Flash!”
Now the Flash! button will be available. Click:
- Flash!
Windows may ask for permission again. If it does, choose:
- Yes
Etcher will now:
- Write the USB
- Verify it (automatic)
During this time:
- Do not remove the USB
- Do not shut down the PC
- It’s fine to let it run without touching anything
Step 7: When it finishes
When Etcher finishes, close Etcher.
- If you are continuing to Mode 2 now, leave the USB plugged in.
- Otherwise, remove the USB and keep it somewhere safe.
H. What Success Looks Like
Mode 1 is complete when Etcher finishes without errors.
You should see:
- Etcher completes the process and shows a finished / success message
- No red error screen or failure message appeared during writing or verifying
You do not need to:
- Open the USB or check its contents
- Test it in Windows
- Format it again
If Etcher says it’s finished, you’re done.
If Windows shows a message after Etcher finishes
Windows may display messages like:
- “You need to format the disk in drive X: before you can use it.”
Do not format the USB. Close the message.
A bootable Linux USB does not look like a normal storage USB to Windows.
I. What to Do With the USB Now
- Leave the USB exactly as it is
- Keep it somewhere safe until you start the next mode
- Optional: label it with a felt marker (example: “Linux Mint USB”)
That’s all.
J. What Happens Next (Mode 2 Preview)
In Mode 2, you will restart your PC and choose the USB from a menu. This lets you test Linux without installing it.
You will:
- Restart the PC
- Open the PC’s boot menu
- Choose the USB
- Linux Mint starts temporarily
You can quickly test:
- Wi-Fi
- Sound
- Keyboard / mouse / trackpad
- Display / brightness
- General performance
After testing, you restart and return to Windows.
K. Stop Point
At this point, you have created a working USB boot drive.
Next section:
Mode 2 – Try Linux Without Installing (Live USB)