Contents
Mode 3 – Choosing How to Install Linux
What This Mode Does
- Helps you choose one of two installation paths – linux mint dual boot vs external ssd
- Prepares Windows and your PC firmware so Linux installation works smoothly in Mode 4
What You’ll Choose
- Option 1: Install Linux alongside Windows (Dual Boot) (easier install, but uses space from your Windows drive)
- Option 2: Install Linux on an external SSD (physically separate, but requires more careful steps during installation)
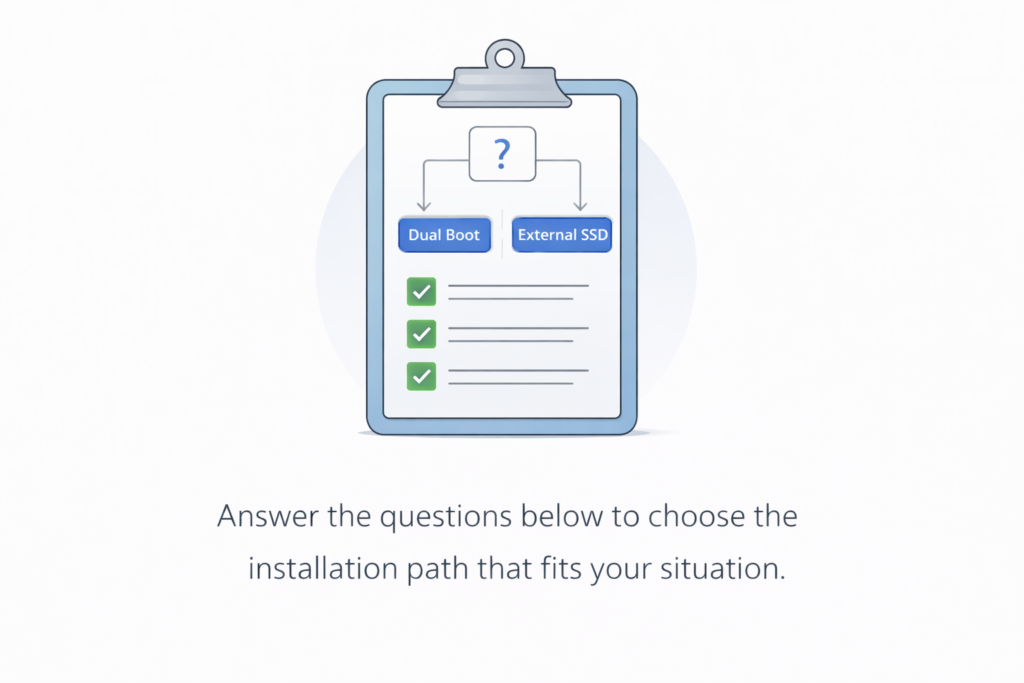
Part A – Choose Your Installation Path
A1 – Quick Comparison
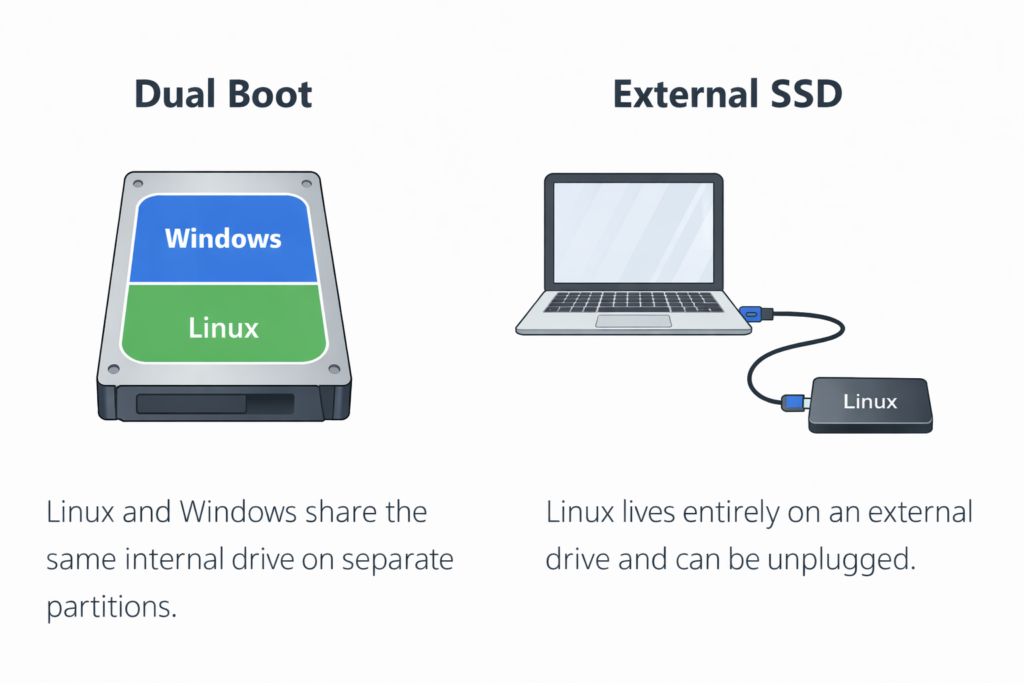
Option 1: Install Linux alongside Windows (Dual Boot)
Best for you if:
- You want the simplest install process (Mint handles it)
- You have enough free space to shrink Windows safely and give Linux its own space
- You plan to use Linux often
- You don’t want to purchase additional hardware or accessories
What changes:
- Your computer’s internal drive will be divided into two parts (partitions)
- The Windows partition becomes smaller, and a new Linux partition is created in the freed space
- After that, you’ll have two operating systems available at startup: Windows and Linux
- Windows still works normally – it just has less disk space than before
What you may see at startup:
- When you turn on your PC, you may see a menu called GRUB (the Linux boot menu)
- It lets you choose Linux or Windows before the computer starts
- This is normal – it’s just a choice screen because your PC now has two operating systems
What to expect long-term:
- Sometimes Windows/firmware may start Windows automatically after updates
(Linux is still installed – you can start it from the Boot Menu.) - Removing Linux later is possible, but it takes more steps than unplugging an external drive
Option 2: Install Linux on an external SSD (physically separate from Windows)
Best for you if:
- You want Linux to live on its own drive
- You like the idea of unplugging Linux whenever you like
- You may not stick with Linux long-term
- Your main internal drive is low on space – or you don’t want Linux installed on any internal drive
- You want your Linux system to be physically portable (you can unplug the drive and move it between compatible PCs)
What changes:
- Your internal Windows drive stays untouched
- Linux is installed entirely to the external SSD
Install difficulty (important):
- External SSD installs are more manual. During installation, you will need to select the external drive, create/select partitions, and set mount points.
Recommended hardware (External SSD)
If you choose option 2, you’ll need an external SSD (this is where Linux Mint will be installed).
If you already own one, you can skip this section and continue.
If you need to purchase one, these options work well for Linux installs and everyday use:
- SanDisk 2TB Extreme Portable SSD (For heavy storage needs): Ideal if you plan to store large video, photo, or backup libraries on the same drive.
- SanDisk 1TB Extreme Portable SSD (Very Reliable and Recommended for most users): Enough space for Linux, updates, and personal files without worrying about running out of room.
- SSK Portable SSD 500GB External SSD – (Faster, More Affordable)
This drive uses NVMe storage inside a USB-C enclosure, making it significantly faster than traditional external hard drives.
For Linux Mint installations, this means:
- Faster boot times
- Smoother system updates
- Better overall responsiveness
SSK is a budget-friendly brand that offers strong performance for the price. While not as established as Samsung or SanDisk, it is widely used and well-reviewed.
If you’re looking for a good balance between performance and cost, this is a solid option.
- USB A to USB C Adapter – 3Pack – (Important for older laptops): Many newer SSDs ship with USB-C cables only. If your laptop has traditional rectangular USB ports, you may need this small adapter.
Disclosure: Purchases made through these links may generate a small commission for Jiritsu Lab, at no extra cost to you. This supports the website and the continued development of educational resources.
Note: Many external SSDs ship preformatted (often NTFS) and may contain files. In this guide, you’ll wipe the drive and create the Linux partitions before installing.
What to expect long-term:
- To use Linux, the external SSD must be plugged in before you power on (or before you open the Boot Menu).
- On some PCs, when the external SSD is plugged in, you may see the GRUB menu at startup and be able to boot into Linux automatically.
- On other PCs, you’ll need to use the Boot Menu to choose the external drive.
- If the external SSD is unplugged, the PC boots Windows normally.
- For best performance, use a USB 3.x port (often blue). Avoid USB hubs during installation.
- If you move the SSD to another PC, it will often boot, but hardware differences can require extra steps.
A2 – The Decision Questions
Question 1: Do you want the simplest, most automatic installation flow?
- Yes → Choose Dual Boot. (Linux Mint handles most steps automatically.)
- No / Unsure → Go to Question 2.
Question 2: Do you want Linux to be physically removable?
(For example, you unplug the drive and Linux is no longer available on that PC.)
- Yes → Choose External SSD.
- No → Go to Question 3.
Question 3: Do you have enough free space to safely shrink Windows?
To live comfortably, Windows needs a buffer of about 30 to 40 GB for updates, and Linux Mint needs about 50 GB for apps and files.
The check:
Look at your Windows (C:) drive. Do you see at least 100 GB of free space?
- Yes → Choose Dual Boot. (You have enough space to share safely.)
- No → Choose External SSD. (This keeps your Windows drive exactly as it is and avoids space issues.)
A3 – Lock Your Choice
Take a mental note of your choice now:
- ✅ “I’m installing alongside Windows (Dual Boot)“
or
- ✅ “I’m installing on an external SSD“
Next, we’ll do three preparation steps that will help make the Linux installation work reliably in Mode 4.
Part B – Prepare Windows and Firmware (Required – Do not skip)
Why This Matters
Modern Windows PCs are designed to protect and prioritize Windows by default. Before installing Linux, we need to disable a few Windows-centric features that commonly interfere with the process. These steps ensure your hard drive is “unlocked” and your computer is allowed to start an operating system other than Windows. Nothing is installed yet; this is preparation only.
B1- Turn Off Device Encryption (BitLocker)
What this does
Many modern PCs automatically encrypt the hard drive. If this is on, the Linux installer cannot safely resize your Windows partition to make room for Linux. Even for external installs, leaving this “On” can trigger security lockouts. Not all PCs have this enabled; if yours is already off, you can skip this.
Steps (Windows 11)
- Open the Start menu and search for Device Encryption.
- Go to Settings → Privacy & security → Device encryption.
- Switch Device encryption to Off.

Steps (Windows 10)
- Open the Start menu and search for Device Encryption.
- Go to Settings → Update & Security → Device encryption.
- Click Turn off.
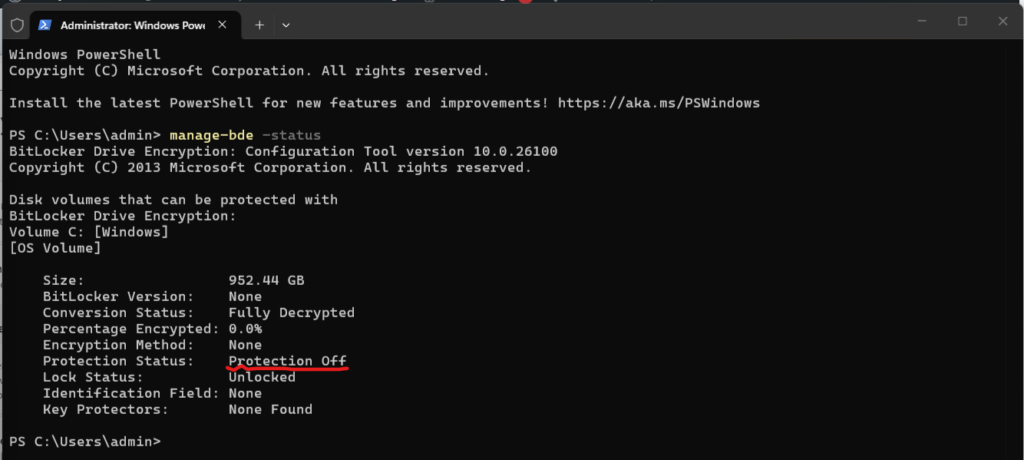
If you can’t find the setting (Advanced Check)
- Right-click the Start button and open Terminal (Admin) or Command Prompt (Admin).
- Type
manage-bde -statusand press Enter. - If “Protection Status” says Protection Off, you are safe.
- If it says Protection On, type
manage-bde -off C:and wait for it to reach 100%.
B2 – Turn Off Fast Startup (Windows)
What this does
Fast Startup leaves Windows in a “partial shutdown” state. This “locks” the hardware and can prevent Linux from accessing the disk safely or even booting at all.
Steps (Windows 10/11)
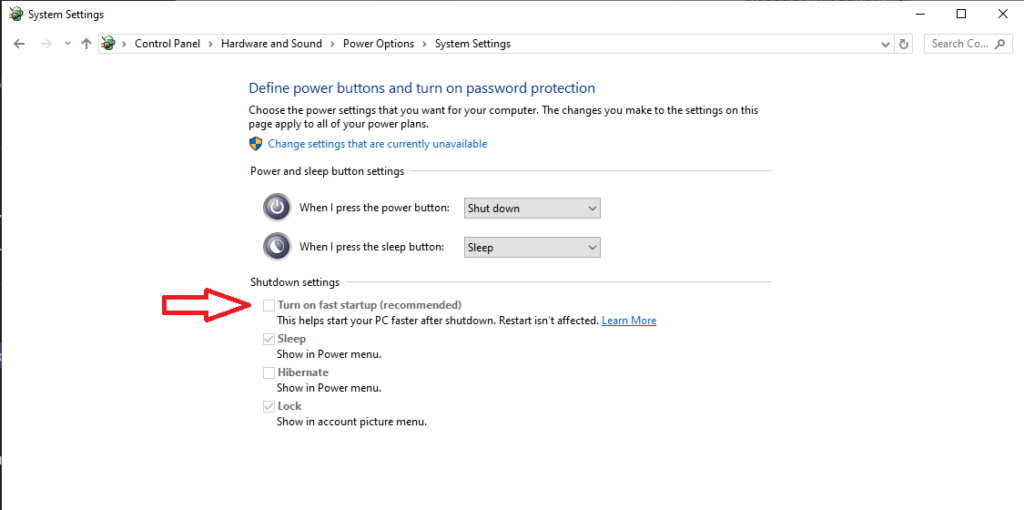
- Open Control Panel.
- Go to Hardware and Sound → Power Options.
- Click Choose what the power buttons do.
- Click Change settings that are currently unavailable.
- Uncheck Turn on fast startup (recommended) and click Save.
- Restart your PC once after doing this.
Quick confirmation
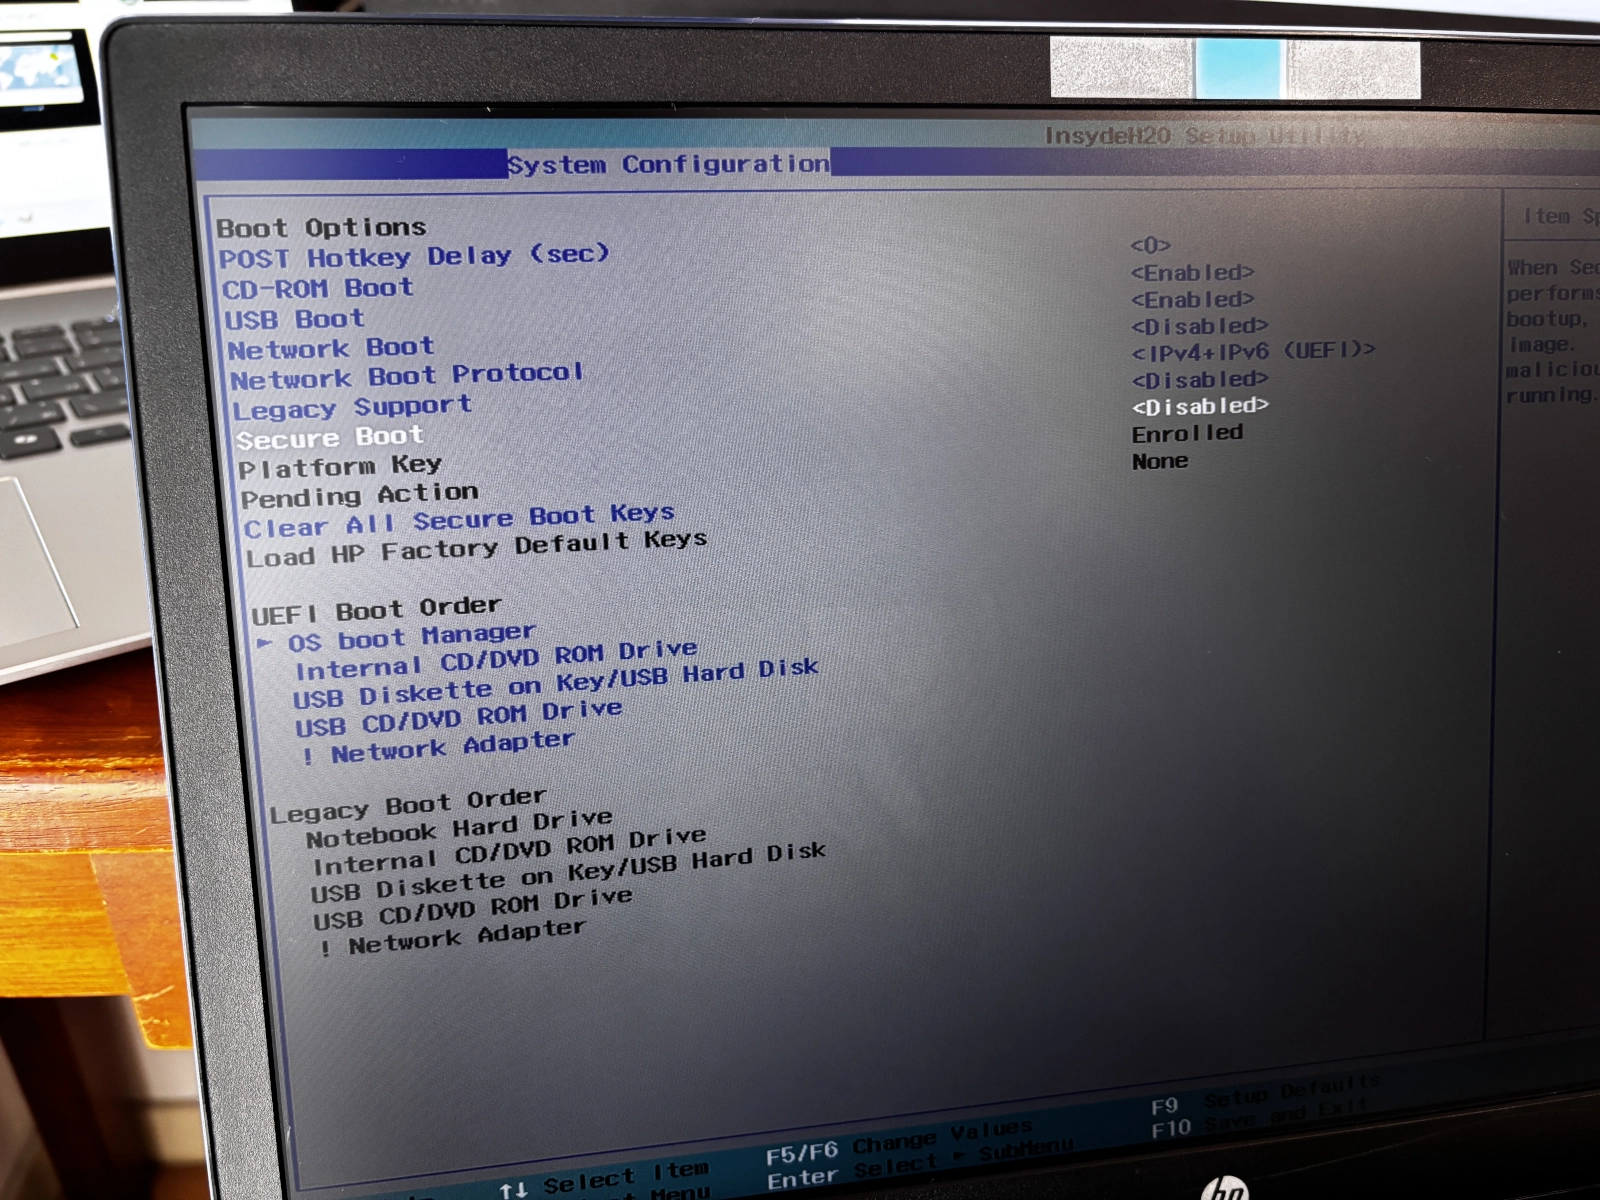
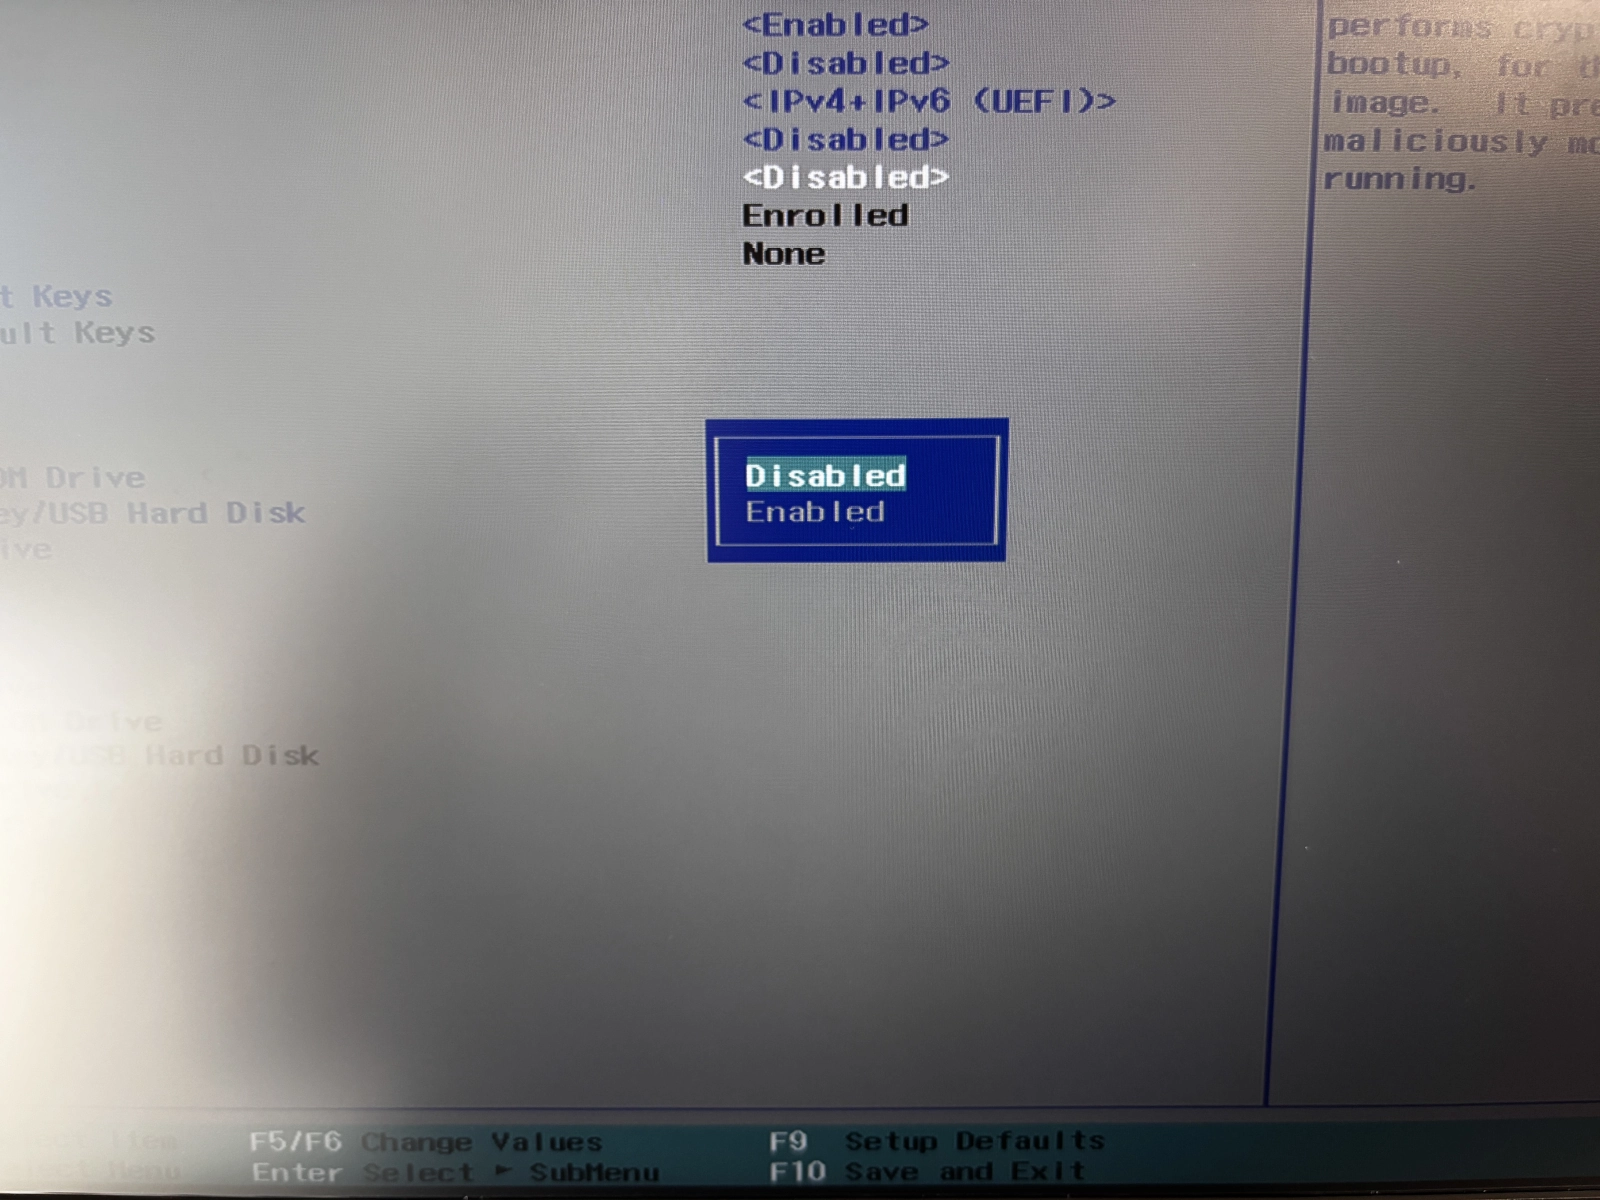
B3 – Disable Secure Boot and Firmware Fast Boot (UEFI/BIOS)
What this does
Secure Boot blocks non-Windows bootloaders by default. Firmware Fast Boot (different from the Windows setting above) can make your computer skip looking for your Linux USB drive entirely.
Firmware menus vary a lot by PC model. Your screen may not match the examples exactly, and Secure Boot can be in different places (often under Security, Boot, or Authentication). It can feel intimidating the first time, but you’re not “breaking” anything here – you’re just changing a startup setting.
Note: Some PCs don’t include a Firmware Fast Boot option at all. If you can’t find it, that’s fine – just make sure Secure Boot is Disabled and continue.
Steps (high-level, brand-neutral)
- Restart your PC and enter firmware setup (usually by tapping Esc, F2, or Del during startup).
- Find Secure Boot and set it to Disabled.
- Find Fast Boot (if present) and set it to Disabled.
- Save and Exit.
*Important note*
If you can’t find Secure Boot, don’t guess. Search your PC model online+ “disable secure boot”.
Secure Boot disable confirmation (sometimes): Some firmware requires a one-time confirmation after you turn Secure Boot off. On the next reboot, you may see a prompt to enter a code displayed on-screen to confirm the change. Complete the prompt to proceed.
B4 – Ready for Mode 4?
Checklist
- ✅ Install path chosen (Dual Boot or External SSD)
- ✅ Device Encryption (BitLocker) turned Off
- ✅ Windows Fast Startup disabled
- ✅ Secure Boot and Firmware Fast Boot disabled
Next: Go to Mode 4 and follow the track that matches your choice.
Stopping Point
This is a good place to pause.
You’ve chosen an installation path and prepared Windows and firmware so Linux can install cleanly in the next step.
You can shut down, restart, or come back later and continue with Mode 4 when you’re ready.
Return to Mode 2 – Trying Linux from Live USB Continue to Mode 4 – Install Linux Mint